Notice: This Wiki is now read only and edits are no longer possible. Please see: https://gitlab.eclipse.org/eclipsefdn/helpdesk/-/wikis/Wiki-shutdown-plan for the plan.
Difference between revisions of "BPMN2-Modeler/DeveloperTutorials/CreateCustomTask"
m (Ralph.soika.imixs.com moved page BPMN2-Modeler/Tutorials/CreateCustomTask to BPMN2-Modeler/DeveloperTutorials/CreateCustomTask: wrong tutorial section) |
|||
| Line 1: | Line 1: | ||
| + | ==Versions== | ||
| + | This Tutorial was developed with Eclipse 4.4 (Luna) and BPMN2-Plugin version 1.1.1. | ||
| + | |||
==Create a Custom task== | ==Create a Custom task== | ||
| − | This section explains how to add a new customTask element extending the BPMN task element. | + | This section explains how to add a new customTask element extending the BPMN task element. The tutorial assumes that you already have extend the BPMN runtime like explained in the [[BPMN2-Modeler/DeveloperTutorials/ExtendingRuntime|BPMN Runtime Tutorial]]. |
| − | Extending a BPMN | + | Extending a BPMN element covers the following aspects: |
* The visual modelling element | * The visual modelling element | ||
| Line 8: | Line 11: | ||
* Optional property sections to configure the element | * Optional property sections to configure the element | ||
| − | To define a new customTask element just open the plugin.xml file and create a new ‘CustomTask’ to your bpmn plugin extension node. In the property ‘runtimeid’ add the previous defined Runtime ID. In the property ‘Type’ enter ‘Task’ to use the standard task object type to be extended from BPMN2. The Property ‘category’ defines a new section in the tool palette where your new element will be available. | + | To define a new customTask element just open the plugin.xml file and create a new ‘CustomTask’ to your bpmn plugin extension node (See the [[BPMN2-Modeler/DeveloperTutorials/ExtendingRuntime|BPMN Runtime Tutorial]]). In the property ‘runtimeid’ add the previous defined Runtime ID. In the property ‘Type’ enter ‘Task’ to use the standard task object type to be extended from BPMN2. The Property ‘category’ defines a new section in the tool palette where your new element will be available. |
Next you need to generate a new Java class for the FeatureContainer. This can be done form the plugin editor by click on ‘featureContainer*’. The class can be extended form the ‘CustomShapeFeatureContainer’. See the following example: | Next you need to generate a new Java class for the FeatureContainer. This can be done form the plugin editor by click on ‘featureContainer*’. The class can be extended form the ‘CustomShapeFeatureContainer’. See the following example: | ||
Revision as of 05:39, 11 March 2015
Versions
This Tutorial was developed with Eclipse 4.4 (Luna) and BPMN2-Plugin version 1.1.1.
Create a Custom task
This section explains how to add a new customTask element extending the BPMN task element. The tutorial assumes that you already have extend the BPMN runtime like explained in the BPMN Runtime Tutorial.
Extending a BPMN element covers the following aspects:
- The visual modelling element
- The properties of the custom element
- Optional property sections to configure the element
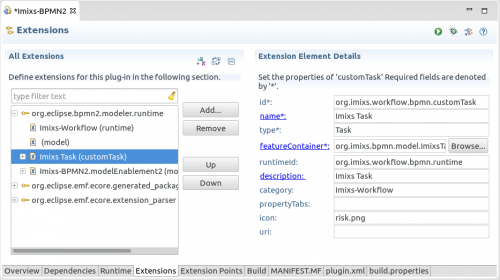
To define a new customTask element just open the plugin.xml file and create a new ‘CustomTask’ to your bpmn plugin extension node (See the BPMN Runtime Tutorial). In the property ‘runtimeid’ add the previous defined Runtime ID. In the property ‘Type’ enter ‘Task’ to use the standard task object type to be extended from BPMN2. The Property ‘category’ defines a new section in the tool palette where your new element will be available.
Next you need to generate a new Java class for the FeatureContainer. This can be done form the plugin editor by click on ‘featureContainer*’. The class can be extended form the ‘CustomShapeFeatureContainer’. See the following example:
public class TestTaskElementFeatureContainer1 extends CustomShapeFeatureContainer {

 // these values must match what's in the plugin.xml
 private final static String TYPE_VALUE = "TestTask";
 private final static String CUSTOM_TASK_ID = "Imixs-BPMN2.customTask1";

 public TestTaskElementFeatureContainer1() {

 }

 @Override
 public String getId(EObject object) {
 // This is where we inspect the object to determine what its custom task ID should be.
 // In this case, the "type" attribute will have a value of "MyTask".
 // If found, return the CUSTOM_TASK_ID string.
 //
 // Note that the object inspection can be arbitrarily complex and may include several
 // object features. This simple case just demonstrates what needs to happen here.
 EStructuralFeature f = ModelDecorator.getAnyAttribute(object, "type");
 if (f!=null) {
 Object id = object.eGet(f);
 if (TYPE_VALUE.equals(id))
 return CUSTOM_TASK_ID;
 }

 return null;
 }


 @Override
 public ICustomFeature[] getCustomFeatures(IFeatureProvider fp) {
 return new ICustomFeature[] {new ShowPropertiesFeature(fp)};
 }
}
To identify the task element the class should be assigned to, you can add a new property named ‘type’ into the customTask extension point. Use the plugin.xml editor and add a new property to your customTask with the name ‘type’ and the value ‘TestTask’. These values are evaluated from the new TestTaskElementFeatureContainer1 class.
You can now also define additional custom properties. These properties will be displayed in the ‘Task’ property Section when you edit the new Task Element with the BPMN Editor. This kind of properties are called ‘dynamic properties’. This is the easiest way to create a custom BPMN element.

