Notice: This Wiki is now read only and edits are no longer possible. Please see: https://gitlab.eclipse.org/eclipsefdn/helpdesk/-/wikis/Wiki-shutdown-plan for the plan.
OM2M/Developer
< OM2M
Revision as of 09:57, 1 August 2014 by Unnamed Poltroon (Talk) (→Develop your interworking proxy unit plugin)
Contents
Prerequisite
- Eclipse kepler IDE: available on this link: http://www.eclipse.org/kepler/
- OM2M source code: you can download OM2M from this link: http://wiki.eclipse.org/OM2M/Download
- Maven: It’s available on the the Eclipse Kepler IDE
- Tycho: Available on the marketplace of maven
Build OM2M from source: step by step
Download OM2M source code
- Select Windiow->Show View -> Other .
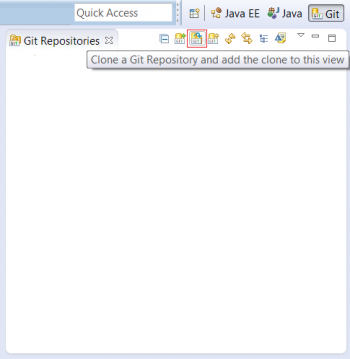
- In the dialog box, select the Git view.
- Click on “Clone a Git repository”.
- Clone the OM2M project using the following link: http://git.eclipse.org/gitroot/om2m/org.eclipse.om2m.git. In the first page, enter the mentionned link in the URI’s location field. Click Next .
- In the second page, keep the “master” branch checkbox selected and click Next.
- In the third page, check the “clone submodules” and “import all existing projects after clone finishes” checkboxes and click “Finish”.
- The OM2M project is now cloned and is visible on the Git repositories’ and Package’ explorers.
- Now we will add the required libraries. This step will be removed when all third libraries will be validated by Eclipse.
- Download the libraries from this link: http://wiki.eclipse.org/OM2M/Download
- Extract OM2M-libs and add the following libraries to "org.eclipse.om2m" repository as follows:
- "db4o-core-java5-8.1-SNAPSHOT.jar" library under "org.eclipse.om2m.core\libs",
- "obix.jar" library under "org.eclipse.om2m.commons\libs",
- "xsd" folder under "org.eclipse.om2m.commons\src\main\resources".
Build OM2M using maven
- Before building the OM2M project, you need to add “Tycho” to Maven plugin. (Why? more details) To do so, click Window -> Preferences -> maven -> discovery -> open catalog and type Tycho. Check the “Tycho Configurator” checkbox.
- Select “org.eclipse.om2m” package and right click. Select “Run as -> maven install”.
- Two Eclipse products will be generated after a successful built:
- The NSCL product can be found on this directory: "om2m/org.eclipse.om2m/org.eclipse.om2m.site.nscl/target/products/nscl/<os>/<ws>/<arch>"
- The GSCL product can be found on this directory: "om2m/org.eclipse.om2m/org.eclipse.om2m.site.gscl/target/products/gscl/<os>/<ws>/<arch>"
Develop your interworking proxy unit plugin
We will start this section by demonstring how to create an interworking proxy plugin and associate it to the om2m platform. Then, we will implement this plugin by adding a MonitorSample class to simulate a sensor behavior and a ControllerSample class to manage a simulated actuator.


