Notice: This Wiki is now read only and edits are no longer possible. Please see: https://gitlab.eclipse.org/eclipsefdn/helpdesk/-/wikis/Wiki-shutdown-plan for the plan.
Automatic Stub Project Build
| Eclipse Home | Wiki Home | Development | Development Environment |
Contents
Automatic Stub Project Build
This document will introduce you to the automatic build of stub projects.
What are stub projects
Corona "Stub" projects contain libraries which are still waiting for eclipse IP approval, hence cannot be found in our CVS repository. If you'll get such project it will not compile because of lack of required jar files.
Standard Stub Project Structure
Standard stub project (with one exception) does not contain any source files. Such project contains only libraries and exposes it's packages to other plug-ins.
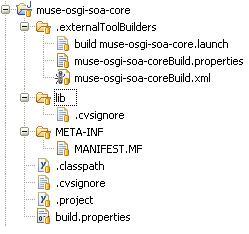
Standard stub project structure (muse project as the example):

Automatic build files
All automatic build files with one exception can be found in int <plug-in name>/.externalToolBuilders directory. The exception is a standard eclipse .project file which is located in the root of the plug-in.
Ant build script
The build script in most cases is named as follows: <last part of plugin name>Build.xml. The script contains two major parts (tasks):
- build:
- Build task is called when standard build operation is performed on the project. The build task consists following sections
- clean:
- Clean task is called when standard clean operation is performed on the project.
In current build script state the clean task, is a dummy task and it does not perform any operation on the project.
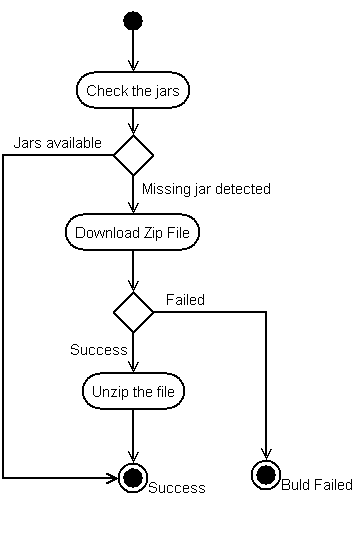
A diagram below shows an overall idea of automatic build script process:

Ant build properties
The build properties file is located in externalToolBuilders directory and is called <last part of plugin name>Build.properties. It contains 3 major sections:
- proxy setting
- Check the proxy settings section for more information.
- download
- This section describes the name and the location of zip file containing required jar files. It also describes the path from the zip file which contain the jar files and which should be copied into local lib folder. Check the example written below:
axis.all.in.one.location=http://people.apache.org/~jhawkins/Corona_M6/
axis.all.in.one.name=plugins.zip
axis.all.in.one.copy.dir=/plugins/org.apache.axis2_1.0.0/lib
- required jars description
- This section have all required jar files described, and it's strictly connected with check.<jar name> tasks from the build file.
activation=activation-1.1.jar
annogen=annogen-0.1.0.jar
Launch file
The launch file is located in externalToolBuilders directory and is called build <last part of plugin name>.launch. Check the example of launch file from org.apache.axis2 plugin. Below you can find the description of most important attributes:
- org.eclipse.ui.externaltools.ATTR_LOCATION
- It's specifies the location of the ant script to be started.
<stringAttribute key="org.eclipse.ui.externaltools.ATTR_LOCATION"
value="${workspace_loc:/muse-osgi-soa-core/.externalToolBuilders/muse-osgi-soa-coreBuild.xml}"/>
- org.eclipse.debug.core.ATTR_REFRESH_SCOPE
- this attribute specifies the refresh scope after the build/clean operation. (like refresh the project)
<stringAttribute key="org.eclipse.debug.core.ATTR_REFRESH_SCOPE" value="${project}"/>
- org.eclipse.ui.externaltools.ATTR_RUN_BUILD_KINDS
- this attribute specifies the build kinds which triggers the launch
<stringAttribute key="org.eclipse.ui.externaltools.ATTR_RUN_BUILD_KINDS" value="full,auto,clean"/>
How it's started (.project file)
To attach the build script to project we had to modify the .project file and add to <buildSpec> section new <buildCommand> section.
Example below shows new part added to org.apache.axis2 .project file:
<buildCommand>
   <name>org.eclipse.ui.externaltools.ExternalToolBuilder</name>
      <arguments>
         <dictionary>
            <key>LaunchConfigHandle</key>
            <value><project>/.externalToolBuilders/build axis2.launch</value>
         </dictionary>
      </arguments>
</buildCommand>
Automatic Build configuration
Proxy setting
You may encounter problems with downloading zip files. The problem might be connected with your proxy settings. You have to specify following properties which has to be accessed by ant script:
- proxyhost
- proxyport
- proxyuser
- proxypassword
You can specify those values by:
- defining ant global properties.
- go in eclipse Window->Preferences...->Ant->Runtime properties tab and define there properties described above.
- changing project's automatic build property file.
- uncomment and change proper values in <project name>/.externalToolBuilders/<projectname>Build.properties file.
Disabling automatic download
If you don't want the project to download the Jar files you can disable the build by setting below propert:
no.auto.build=true
Modifying automatic builds
Adding new Jar files to the project
If you want to add new jar file to the project, you'll have to perform following steps:
- add new property to the properties file like:
muse-osgi-soa-core=muse-osgi-soa-core-2.0.0.jar
<new_jar_name>=<new_jar_name><version>.jar
- add new task to build file like:
<target name="check.<new_jar_name>" unless="need.download">
   <condition property="need.download">
      <not>
         <available file="${basedir}/lib/${<new_jar_name>}" />
      </not>
   </condition>
</target>
- add the dependency to new task in getJar task, like:
<target name="getJars" depends="init,
                                check.muse-osgi-soa-core,
                                check.<new_jar_name>"
        if="need.download"
        unless="no.auto.build">
Changing the Jar version
If you'd like to change a version of certain jar file, you'll have to modify modify the name of jar file withing the properties file.
E.g. if you'd like to change from muse-osgi-soa-core-2.0.0.jar to muse-osgi-soa-core-2.0.1.jar you will have to change the properties file like:
<< old
  muse-osgi-soa-core=muse-osgi-soa-core-2.0.0.jar
<<
>> new
  muse-osgi-soa-core=muse-osgi-soa-core-2.0.1.jar
>>
Removing the Jar from the lib directory
If you'll have to remove the jar file from the lib directory, you'll need to perform following steps:
- remove old <old_jar_name> property from the properties file:
- remove old check.<old_jar_name> task from build file.
- remove the dependency to old task from getJar task.
