Notice: This Wiki is now read only and edits are no longer possible. Please see: https://gitlab.eclipse.org/eclipsefdn/helpdesk/-/wikis/Wiki-shutdown-plan for the plan.
Difference between revisions of "Configuring a Relational Project (ELUG)"
m (→How to Configure Sequencing at the Project Level Using Workbench) |
m |
||
| (22 intermediate revisions by 3 users not shown) | |||
| Line 1: | Line 1: | ||
| + | [[Image:Elug draft icon.png]] '''For the latest EclipseLink documentation, please see http://www.eclipse.org/eclipselink/documentation/ ''' | ||
| + | |||
| + | ---- | ||
| + | |||
<div style="margin:5px;float:right;border:1px solid #000000;padding:5px">__TOC__ | <div style="margin:5px;float:right;border:1px solid #000000;padding:5px">__TOC__ | ||
[[Special:Whatlinkshere/Configuring a Relational Project (ELUG)|Related Topics]]</div> | [[Special:Whatlinkshere/Configuring a Relational Project (ELUG)|Related Topics]]</div> | ||
| − | |||
| − | |||
| − | |||
| − | |||
This section describes the various components that you must configure in order to use a relational project. | This section describes the various components that you must configure in order to use a relational project. | ||
| − | This section also describes logging into a database during development when using Workbench. For more information, see [[#Logging In to the Database | + | This section also describes logging into a database during development when using Workbench. For more information, see [[#Logging In to the Database|Logging In to the Database]]. |
| − | + | ||
| − | + | ||
| − | + | ||
| − | + | ||
| − | + | ||
| − | + | ||
| − | + | ||
| − | + | ||
| − | + | ||
| − | + | ||
| − | + | For information on how to create relational projects, see [[Creating%20a%20Relational%20Project%20(ELUG)|Creating a Relational Project]]. | |
| − | This table lists the configurable options for relational projects. | + | This table lists the configurable options for relational projects. In addition to the configurable options described here, you must also configure the base class options described in [[Configuring%20a%20Project%20(ELUG)|Configuring a Project]]. |
<span id="Table 25-1"></span> | <span id="Table 25-1"></span> | ||
| − | |||
| − | {| class="RuleFormalMax" dir="ltr" title="Configurable Options for Relational Projects" summary="This table lists the configurable options common to relational projects | + | {| class="RuleFormalMax" dir="ltr" title="Configurable Options for Relational Projects" summary="This table lists the configurable options common to relational projects and indicates if the option can be configured with the EclipseLink Workbench, Java, or both." width="100%" border="1" frame="border" rules="all" cellpadding="3" frame="border" rules="all" |
|- align="left" valign="top" | |- align="left" valign="top" | ||
! id="r1c1-t2" align="left" valign="bottom" | '''Option to Configure''' | ! id="r1c1-t2" align="left" valign="bottom" | '''Option to Configure''' | ||
| Line 34: | Line 23: | ||
|- align="left" valign="top" | |- align="left" valign="top" | ||
| id="r2c1-t2" headers="r1c1-t2" align="left" | | | id="r2c1-t2" headers="r1c1-t2" align="left" | | ||
| − | + | [[Configuring%20a%20Project%20(ELUG)#Configuring Project Save Location|Project save location]] | |
| headers="r2c1-t2 r1c2-t2" align="left" | | | headers="r2c1-t2 r1c2-t2" align="left" | | ||
[[Image:support.gif|Supported]] | [[Image:support.gif|Supported]] | ||
| Line 41: | Line 30: | ||
|- align="left" valign="top" | |- align="left" valign="top" | ||
| id="r3c1-t2" headers="r1c1-t2" align="left" | | | id="r3c1-t2" headers="r1c1-t2" align="left" | | ||
| − | + | [[Configuring%20a%20Project%20(ELUG)#Configuring Project Classpath|Project classpath]] | |
| headers="r3c1-t2 r1c2-t2" align="left" | | | headers="r3c1-t2 r1c2-t2" align="left" | | ||
[[Image:support.gif|Supported]] | [[Image:support.gif|Supported]] | ||
| Line 48: | Line 37: | ||
|- align="left" valign="top" | |- align="left" valign="top" | ||
| id="r4c1-t2" headers="r1c1-t2" align="left" | | | id="r4c1-t2" headers="r1c1-t2" align="left" | | ||
| − | + | [[Configuring%20a%20Project%20(ELUG)#Configuring Project Comments|Project comments]] | |
| headers="r4c1-t2 r1c2-t2" align="left" | | | headers="r4c1-t2 r1c2-t2" align="left" | | ||
[[Image:support.gif|Supported]] | [[Image:support.gif|Supported]] | ||
| Line 55: | Line 44: | ||
|- align="left" valign="top" | |- align="left" valign="top" | ||
| id="r5c1-t2" headers="r1c1-t2" align="left" | | | id="r5c1-t2" headers="r1c1-t2" align="left" | | ||
| − | + | [[Configuring%20a%20Project%20(ELUG)#Configuring Method or Direct Field Access at the Project Level|Method or direct field access]]) | |
| headers="r5c1-t2 r1c2-t2" align="left" | | | headers="r5c1-t2 r1c2-t2" align="left" | | ||
[[Image:support.gif|Supported]] | [[Image:support.gif|Supported]] | ||
| Line 62: | Line 51: | ||
|- align="left" valign="top" | |- align="left" valign="top" | ||
| id="r6c1-t2" headers="r1c1-t2" align="left" | | | id="r6c1-t2" headers="r1c1-t2" align="left" | | ||
| − | + | [[Configuring%20a%20Project%20(ELUG)#Configuring Default Descriptor Advanced Properties|Default descriptor advanced properties]] | |
| headers="r6c1-t2 r1c2-t2" align="left" | | | headers="r6c1-t2 r1c2-t2" align="left" | | ||
[[Image:support.gif|Supported]] | [[Image:support.gif|Supported]] | ||
| Line 69: | Line 58: | ||
|- align="left" valign="top" | |- align="left" valign="top" | ||
| id="r7c1-t2" headers="r1c1-t2" align="left" | | | id="r7c1-t2" headers="r1c1-t2" align="left" | | ||
| − | + | [[Configuring%20a%20Project%20(ELUG)#Configuring Existence Checking at the Project Level|Existence checking ]] | |
| headers="r7c1-t2 r1c2-t2" align="left" | | | headers="r7c1-t2 r1c2-t2" align="left" | | ||
[[Image:support.gif|Supported]] | [[Image:support.gif|Supported]] | ||
| Line 76: | Line 65: | ||
|- align="left" valign="top" | |- align="left" valign="top" | ||
| id="r8c1-t2" headers="r1c1-t2" align="left" | | | id="r8c1-t2" headers="r1c1-t2" align="left" | | ||
| − | + | [[Configuring%20a%20Project%20(ELUG)#Configuring Project Deployment XML Options|Project deployment XML options]] | |
| headers="r8c1-t2 r1c2-t2" align="left" | | | headers="r8c1-t2 r1c2-t2" align="left" | | ||
[[Image:support.gif|Supported]] | [[Image:support.gif|Supported]] | ||
| Line 83: | Line 72: | ||
|- align="left" valign="top" | |- align="left" valign="top" | ||
| id="r9c1-t2" headers="r1c1-t2" align="left" | | | id="r9c1-t2" headers="r1c1-t2" align="left" | | ||
| − | + | [[Configuring%20a%20Project%20(ELUG)#Configuring Model Java Source Code Options|Model Java source code options]] | |
| headers="r9c1-t2 r1c2-t2" align="left" | | | headers="r9c1-t2 r1c2-t2" align="left" | | ||
[[Image:support.gif|Supported]] | [[Image:support.gif|Supported]] | ||
| Line 90: | Line 79: | ||
|- align="left" valign="top" | |- align="left" valign="top" | ||
| id="r10c1-t2" headers="r1c1-t2" align="left" | | | id="r10c1-t2" headers="r1c1-t2" align="left" | | ||
| − | + | [[#Configuring Relational Database Platform at the Project Level|Relational database ]] | |
| headers="r10c1-t2 r1c2-t2" align="left" | | | headers="r10c1-t2 r1c2-t2" align="left" | | ||
[[Image:support.gif|Supported]] | [[Image:support.gif|Supported]] | ||
| Line 97: | Line 86: | ||
|- align="left" valign="top" | |- align="left" valign="top" | ||
| id="r11c1-t2" headers="r1c1-t2" align="left" | | | id="r11c1-t2" headers="r1c1-t2" align="left" | | ||
| − | + | [[#Configuring Sequencing at the Project Level|Sequencing ]] | |
| headers="r11c1-t2 r1c2-t2" align="left" | | | headers="r11c1-t2 r1c2-t2" align="left" | | ||
[[Image:support.gif|Supported]] | [[Image:support.gif|Supported]] | ||
| Line 104: | Line 93: | ||
|- align="left" valign="top" | |- align="left" valign="top" | ||
| id="r12c1-t2" headers="r1c1-t2" align="left" | | | id="r12c1-t2" headers="r1c1-t2" align="left" | | ||
| − | + | [[#Configuring Login Information at the Project Level|Login information]] | |
| headers="r12c1-t2 r1c2-t2" align="left" | | | headers="r12c1-t2 r1c2-t2" align="left" | | ||
[[Image:support.gif|Supported]] | [[Image:support.gif|Supported]] | ||
| Line 111: | Line 100: | ||
|- align="left" valign="top" | |- align="left" valign="top" | ||
| id="r13c1-t2" headers="r1c1-t2" align="left" | | | id="r13c1-t2" headers="r1c1-t2" align="left" | | ||
| − | + | [[#Configuring Development and Deployment Logins|Development and deployment logins ]] | |
| headers="r13c1-t2 r1c2-t2" align="left" | | | headers="r13c1-t2 r1c2-t2" align="left" | | ||
[[Image:support.gif|Supported]] | [[Image:support.gif|Supported]] | ||
| Line 118: | Line 107: | ||
|- align="left" valign="top" | |- align="left" valign="top" | ||
| id="r14c1-t2" headers="r1c1-t2" align="left" | | | id="r14c1-t2" headers="r1c1-t2" align="left" | | ||
| − | + | [[Configuring%20a%20Project%20(ELUG)#Configuring Cache Type and Size at the Project Level|Cache type and size]] | |
| headers="r14c1-t2 r1c2-t2" align="left" | | | headers="r14c1-t2 r1c2-t2" align="left" | | ||
[[Image:support.gif|Supported]] | [[Image:support.gif|Supported]] | ||
| Line 125: | Line 114: | ||
|- align="left" valign="top" | |- align="left" valign="top" | ||
| id="r15c1-t2" headers="r1c1-t2" align="left" | | | id="r15c1-t2" headers="r1c1-t2" align="left" | | ||
| − | + | [[Configuring%20a%20Project%20(ELUG)#Configuring Cache Isolation at the Project Level|Cache isolation ]] | |
| headers="r15c1-t2 r1c2-t2" align="left" | | | headers="r15c1-t2 r1c2-t2" align="left" | | ||
[[Image:support.gif|Supported]] | [[Image:support.gif|Supported]] | ||
| Line 132: | Line 121: | ||
|- align="left" valign="top" | |- align="left" valign="top" | ||
| id="r16c1-t2" headers="r1c1-t2" align="left" | | | id="r16c1-t2" headers="r1c1-t2" align="left" | | ||
| − | + | [[Configuring%20a%20Project%20(ELUG)#Configuring Cache Coordination Change Propagation at the Project Level|Cache coordination change propagation ]] | |
| headers="r16c1-t2 r1c2-t2" align="left" | | | headers="r16c1-t2 r1c2-t2" align="left" | | ||
[[Image:support.gif|Supported]] | [[Image:support.gif|Supported]] | ||
| Line 139: | Line 128: | ||
|- align="left" valign="top" | |- align="left" valign="top" | ||
| id="r17c1-t2" headers="r1c1-t2" align="left" | | | id="r17c1-t2" headers="r1c1-t2" align="left" | | ||
| − | + | [[Configuring%20a%20Project%20(ELUG)#Configuring Cache Expiration at the Project Level|Cache expiration ]] | |
| headers="r17c1-t2 r1c2-t2" align="left" | | | headers="r17c1-t2 r1c2-t2" align="left" | | ||
[[Image:support.gif|Supported]] | [[Image:support.gif|Supported]] | ||
| Line 146: | Line 135: | ||
|- align="left" valign="top" | |- align="left" valign="top" | ||
| id="r18c1-t2" headers="r1c1-t2" align="left" | | | id="r18c1-t2" headers="r1c1-t2" align="left" | | ||
| − | + | [[#Configuring Named Query Parameterized SQL and Statement Caching at the Project Level|Named query parameterized SQL and statement caching ]] | |
| headers="r18c1-t2 r1c2-t2" align="left" | | | headers="r18c1-t2 r1c2-t2" align="left" | | ||
[[Image:support.gif|Supported]] | [[Image:support.gif|Supported]] | ||
| Line 153: | Line 142: | ||
|- align="left" valign="top" | |- align="left" valign="top" | ||
| id="r19c1-t2" headers="r1c1-t2" align="left" | | | id="r19c1-t2" headers="r1c1-t2" align="left" | | ||
| − | + | [[#Configuring Table Generation Options|Table generation options ]] | |
| headers="r19c1-t2 r1c2-t2" align="left" | | | headers="r19c1-t2 r1c2-t2" align="left" | | ||
[[Image:support.gif|Supported]] | [[Image:support.gif|Supported]] | ||
| Line 160: | Line 149: | ||
|- align="left" valign="top" | |- align="left" valign="top" | ||
| id="r20c1-t2" headers="r1c1-t2" align="left" | | | id="r20c1-t2" headers="r1c1-t2" align="left" | | ||
| − | + | [[#Configuring Table Creator Java Source Options|Table creator Java source options ]] | |
| headers="r20c1-t2 r1c2-t2" align="left" | | | headers="r20c1-t2 r1c2-t2" align="left" | | ||
[[Image:support.gif|Supported]] | [[Image:support.gif|Supported]] | ||
| Line 167: | Line 156: | ||
|- align="left" valign="top" | |- align="left" valign="top" | ||
| id="r21c1-t2" headers="r1c1-t2" align="left" | | | id="r21c1-t2" headers="r1c1-t2" align="left" | | ||
| − | + | [[#Configuring Project Java Source Code Options|Project Java source code options ]] | |
| headers="r21c1-t2 r1c2-t2" align="left" | | | headers="r21c1-t2 r1c2-t2" align="left" | | ||
[[Image:support.gif|Supported]] | [[Image:support.gif|Supported]] | ||
| Line 174: | Line 163: | ||
|} | |} | ||
| + | For more information, see [[Introduction%20to%20Relational%20Projects%20(ELUG)|Introduction to Relational Projects]]. | ||
| − | |||
==Configuring Relational Database Platform at the Project Level== | ==Configuring Relational Database Platform at the Project Level== | ||
| − | |||
For each relational project, you must specify the database platform (such as Oracle Database 10''g''). This platform configuration is overridden by the session login, if configured. | For each relational project, you must specify the database platform (such as Oracle Database 10''g''). This platform configuration is overridden by the session login, if configured. | ||
For more information, see the following: | For more information, see the following: | ||
| − | + | * [[Configuring%20a%20Database%20Login%20(ELUG)#Configuring a Relational Database Platform at the Session Level|Configuring a Relational Database Platform at the Session Level]] | |
| − | * [[Configuring%20a%20Database%20Login%20(ELUG)|Configuring a Relational Database Platform at the Session Level]] | + | * [[Introduction%20to%20Data%20Access%20(ELUG)#Data Source Platform Types|Data Source Platform Types]] |
| − | * [[Introduction%20to%20Data%20Access%20(ELUG)|Data Source Platform Types]] | + | |
| − | + | ||
===How to Configure Relational Database Platform at the Project Level Using Workbench=== | ===How to Configure Relational Database Platform at the Project Level Using Workbench=== | ||
| − | |||
To specify the database platform of a relational project, use this procedure: | To specify the database platform of a relational project, use this procedure: | ||
| − | |||
# Select the database object in the '''Navigator'''. The Database property sheet appears.<br>'''''Database Property Sheet, Database Platform Options'''''<br>[[Image:dbplat.gif|Database Property Sheet, Database Platform Options]] | # Select the database object in the '''Navigator'''. The Database property sheet appears.<br>'''''Database Property Sheet, Database Platform Options'''''<br>[[Image:dbplat.gif|Database Property Sheet, Database Platform Options]] | ||
# Complete the Database Platform option on the property sheet. | # Complete the Database Platform option on the property sheet. | ||
# Click '''Change''' to select a new database platform for the project. For more information, see [[Introduction%20to%20Data%20Access%20(ELUG)#Data Source Platform Types|Data Source Platform Types]]. | # Click '''Change''' to select a new database platform for the project. For more information, see [[Introduction%20to%20Data%20Access%20(ELUG)#Data Source Platform Types|Data Source Platform Types]]. | ||
| − | |||
| + | |||
| + | ==Configuring Sequencing at the Project Level== | ||
Sequencing allows EclipseLink to automatically assign the primary key or ID of an object when the object is inserted. | Sequencing allows EclipseLink to automatically assign the primary key or ID of an object when the object is inserted. | ||
You configure EclipseLink sequencing at the project or session level to tell EclipseLink how to obtain sequence values: that is, what type of sequences to use. | You configure EclipseLink sequencing at the project or session level to tell EclipseLink how to obtain sequence values: that is, what type of sequences to use. | ||
| − | In a POJO project, you can configure a session directly: in this case, you can use a session-level sequence configuration to override project-level sequence configuration, on a | + | In a POJO project, you can configure a session directly: in this case, you can use a session-level sequence configuration to override project-level sequence configuration, on a [[Configuring%20a%20Database%20Login%20(ELUG)#Configuring Sequencing at the Session Level|session-by-session basis]]), if required (see . |
| − | + | ||
| − | + | ||
| − | + | ||
| − | + | ||
| − | + | [[#How to Configure Sequencing at the Project Level Using Workbench|Using the Workbench]], you can configure [[Introduction%20to%20Relational%20Projects%20(ELUG)#Table Sequencing|Table Sequencing]] and native sequencing (see [[Introduction%20to%20Relational%20Projects%20(ELUG)#Native Sequencing with an Oracle Database Platform|Native Sequencing with an Oracle Database Platform]] and [[Introduction%20to%20Relational%20Projects%20(ELUG)#Native Sequencing with a Non-Oracle Database Platform|Native Sequencing with a Non-Oracle Database Platform]]), and you can configure a preallocation size that applies to all sequences (see [[Introduction%20to%20Relational%20Projects%20(ELUG)#Sequencing and Preallocation Size|Sequencing and Preallocation Size]]). | |
| − | + | [[#How to Configure Sequencing at the Project Level Using Java|Using Java]], you can configure any sequence type that EclipseLink supports (see [[Introduction%20to%20Relational%20Projects%20(ELUG)#Sequencing Types|Sequencing Types]]). You can create any number and combination of sequences. You can create a sequence object explicitly or use the default sequence that the platform creates. You can associate the same sequence with more than one descriptor and you can configure a separate preallocation size for each descriptor's sequence. | |
| − | + | After configuring the sequence type at the project (or session) level, to enable sequencing, you must [[Configuring%20a%20Relational%20Descriptor%20(ELUG)#Configuring Sequencing at the Descriptor Level|configure a descriptor with a sequence field and a sequence name]]. | |
| + | For more information about sequencing, see [[Introduction%20to%20Relational%20Projects%20(ELUG)#Sequencing in Relational Projects|Sequencing in Relational Projects]]. | ||
| Line 256: | Line 238: | ||
| headers="r8c1-t3 r1c2-t3" align="left" | Specify the name of the column used to store the sequence count. | | headers="r8c1-t3 r1c2-t3" align="left" | Specify the name of the column used to store the sequence count. | ||
|} | |} | ||
| + | |||
===How to Configure Sequencing at the Project Level Using Java=== | ===How to Configure Sequencing at the Project Level Using Java=== | ||
Using Java, you can configure a project to use multiple, different sequences, as this exmaple shows. | Using Java, you can configure a project to use multiple, different sequences, as this exmaple shows. | ||
| − | |||
<span id="Example 25-1"></span> | <span id="Example 25-1"></span> | ||
''''' Configuring Sequencing at the Project Level in Java''''' | ''''' Configuring Sequencing at the Project Level in Java''''' | ||
| − | + | <source lang="java"> | |
| − | + | // Enable native sequencing for the project as the default. Configured the default | |
| + | // preallocation size''' | ||
project.getLogin().useNativeSequencing(); | project.getLogin().useNativeSequencing(); | ||
project.getLogin().setSequencePreallocationSize(50); | project.getLogin().setSequencePreallocationSize(50); | ||
| − | + | // Configure the EMP_SEQ to not use preallocation | |
DefaultSequence empSequence = new DefaultSequence("EMP_SEQ", 1); | DefaultSequence empSequence = new DefaultSequence("EMP_SEQ", 1); | ||
project.getLogin().addSequence(empSequence); | project.getLogin().addSequence(empSequence); | ||
| − | + | // Configure the PROJ_SEQ to use a seperate sequence table | |
UnarySequence projSequence = new UnarySequence("PROJ_SEQ_TAB", "COUNTER"); | UnarySequence projSequence = new UnarySequence("PROJ_SEQ_TAB", "COUNTER"); | ||
project.getLogin().addSequence(projSequence); | project.getLogin().addSequence(projSequence); | ||
| − | + | </source> | |
| − | + | ||
==Configuring Login Information at the Project Level== | ==Configuring Login Information at the Project Level== | ||
| − | This section describes how to define a login to a relational database. After you define a login, you must | + | This section describes how to define a login to a relational database. After you define a login, you must [[#Configuring Development and Deployment Logins|designate its role]]. |
| − | + | ||
| − | + | ||
| + | After you [[#Configuring Login Information at the Project Level|create a login]] and specify it as a [[#Configuring Development and Deployment Logins|development login]], you can [[#Logging In to the Database|log in to a database instance]]. | ||
| Line 291: | Line 272: | ||
To create or edit a database login, use this procedure: | To create or edit a database login, use this procedure: | ||
| − | # Select the database object in the '''Navigator'''. The Database property sheet appears.''''' | + | # Select the database object in the '''Navigator'''. The Database property sheet appears.<br>''''' Database Property Sheet, Database Login Fields'''''<br>[[Image:dbdefine.gif|Database Property Sheet, Database Login Fields]] |
# Click '''Add''' to create a new Defined Login. | # Click '''Add''' to create a new Defined Login. | ||
# Complete the Database Login fields on the property sheet. | # Complete the Database Login fields on the property sheet. | ||
Use this table to enter data in the following fields on the Database property sheet to configure the database login: | Use this table to enter data in the following fields on the Database property sheet to configure the database login: | ||
| − | |||
| − | |||
| − | |||
{| class="HRuleInformal" dir="ltr" title="This table defines the database login options on the Database property sheet for an EclipseLink Workbench project." summary="This table defines the database login options on the Database property sheet for an EclipseLink Workbench project." width="100%" border="1" frame="hsides" rules="rows" cellpadding="3" frame="hsides" rules="rows" | {| class="HRuleInformal" dir="ltr" title="This table defines the database login options on the Database property sheet for an EclipseLink Workbench project." summary="This table defines the database login options on the Database property sheet for an EclipseLink Workbench project." width="100%" border="1" frame="hsides" rules="rows" cellpadding="3" frame="hsides" rules="rows" | ||
|- align="left" valign="top" | |- align="left" valign="top" | ||
| Line 319: | Line 297: | ||
| headers="r6c1-t4 r1c2-t4" align="left" | The password required to log in to the database. | | headers="r6c1-t4 r1c2-t4" align="left" | The password required to log in to the database. | ||
|- align="left" valign="top" | |- align="left" valign="top" | ||
| − | | id="r7c1-t4" headers="r1c1-t4" align="left" | ''' Save Password''' | + | | id="r7c1-t4" headers="r1c1-t4" align="left" | |
| + | :''' Save Password''' | ||
| headers="r7c1-t4 r1c2-t4" align="left" | | | headers="r7c1-t4 r1c2-t4" align="left" | | ||
| − | Whether or not to save the '''Password''' for this '''Defined Login'''. We recommend that you do not save the password with a deployment login.'''Note:''' If you select '''Save Password''', then when you | + | Whether or not to save the '''Password''' for this '''Defined Login'''. |
| + | |||
| + | We recommend that you do not save the password with a deployment login. | ||
| + | |||
| + | '''Note:''' If you select '''Save Password''', then when you [[Creating%20a%20Project%20(ELUG)#Exporting Project Information)|export Java source and deployment XML]], Workbench writes the database password using JCE encryption (when using JDK 1.4 or later). For information on how to specify password encryption options, see [[Configuring%20a%20Data%20Source%20Login%20(ELUG)#Configuring Password Encryption|Configuring Password Encryption]]. | ||
| + | |||
| + | Default: unselected. | ||
|} | |} | ||
| − | + | See Also: | |
| − | + | : [[#Configuring Login Information at the Project Level|Configuring Login Information at the Project Level]] | |
| − | : [[#Configuring Login Information at the Project Level]] | + | : [[#Configuring Relational Database Platform at the Project Level|Configuring Relational Database Platform at the Project Level]] |
| − | : [[#Configuring Relational Database Platform at the Project Level]] | + | : [[#Configuring Development and Deployment Logins|Configuring Development and Deployment Logins]] |
| − | : [[#Configuring Development and Deployment Logins]] | + | |
| Line 335: | Line 319: | ||
==Configuring Development and Deployment Logins== | ==Configuring Development and Deployment Logins== | ||
| − | This section describes how to designate a defined login's role. For information on how to define a login, see [[#Configuring Login Information at the Project Level]]. EclipseLink recognizes the following login roles: | + | This section describes how to designate a defined login's role. For information on how to define a login, see [[#Configuring Login Information at the Project Level|Configuring Login Information at the Project Level]]. EclipseLink recognizes the following login roles: |
| − | + | ||
| − | + | ||
| − | + | ||
| + | * [[#Development Role|Development Role]] | ||
| + | * [[#POJO Session Role|POJO Session Role]] | ||
'''Development Role''' | '''Development Role''' | ||
| − | While using Workbench to develop a project (see [[Introduction%20to%20Projects|Development Role]]), you must define a login (see [[#Configuring Login Information at the Project Level]]) and designate it as the development login. The development login is stored in the EclipseLink project file. Workbench use the information in the development login whenever you perform a data source operation from within Workbench. For example, when you read or write schema information from or to a data source during application development, the development login information is never written to a <code>sessions.xml</code> or <code>project.xml</code> file and is overridden by the deployment login (or the session login) at run time | + | While using Workbench to develop a project (see [[Introduction%20to%20Projects (ELUG)#Development Role|Development Role]]), you must define a login (see [[#Configuring Login Information at the Project Level|Configuring Login Information at the Project Level]]) and designate it as the development login. The development login is stored in the EclipseLink project file. Workbench use the information in the development login whenever you perform a data source operation from within Workbench. For example, when you read or write schema information from or to a data source during application development, the development login information is never written to a <code>sessions.xml</code> or <code>project.xml</code> file and is overridden by the deployment login (or the session login) at run time. |
| − | + | ||
| − | + | ||
| + | For more information on how to use a development login to connect to a database, see [[#Logging In to the Database|Logging In to the Database]]. | ||
'''POJO Session Role''' | '''POJO Session Role''' | ||
| − | If you are creating a | + | If you are creating a [[Introduction%20to%20Projects (ELUG)#POJO Session Role|POJO project]], we recommend that you use the <code>sessions.xml</code> file to store the sessions your project uses at run time (see [[Introduction%20to%20Data%20Access%20(ELUG)#Data Source Login Types|Data Source Login Types]]). |
| − | + | ||
| Line 360: | Line 341: | ||
To specify different development and deployment database logins, use this procedure: | To specify different development and deployment database logins, use this procedure: | ||
| − | # Select the database object in the '''Navigator'''. The Database property sheet appears.<br>''''' | + | # Select the database object in the '''Navigator'''. The Database property sheet appears.<br>''''' Database Property Sheet, Development and Deployment Login Options'''''<br>[[Image:dblogins.gif|Database Property Sheet, Development and Deployment Login Options]] |
# Complete the Development and Deployment Login options on the property sheet by selecting from the logins you configured previously. | # Complete the Development and Deployment Login options on the property sheet by selecting from the logins you configured previously. | ||
Use this table to enter data in the following fields on the Database property sheet to configure the login: | Use this table to enter data in the following fields on the Database property sheet to configure the login: | ||
| − | |||
| − | |||
| − | |||
{| class="HRuleInformal" dir="ltr" title="This table defines the Development Login and Deployment Login fields on the database editor pane." summary="This table defines the Development Login and Deployment Login fields on the database editor pane." width="100%" border="1" frame="hsides" rules="rows" cellpadding="3" frame="hsides" rules="rows" | {| class="HRuleInformal" dir="ltr" title="This table defines the Development Login and Deployment Login fields on the database editor pane." summary="This table defines the Development Login and Deployment Login fields on the database editor pane." width="100%" border="1" frame="hsides" rules="rows" cellpadding="3" frame="hsides" rules="rows" | ||
|- align="left" valign="top" | |- align="left" valign="top" | ||
| Line 374: | Line 352: | ||
| id="r2c1-t5" headers="r1c1-t5" align="left" | '''Development Login''' | | id="r2c1-t5" headers="r1c1-t5" align="left" | '''Development Login''' | ||
| headers="r2c1-t5 r1c2-t5" align="left" | | | headers="r2c1-t5 r1c2-t5" align="left" | | ||
| − | The '''Defined Login''' to be used by Workbench during development to connect with the database, and to read or write table information. For more information on how to use a development login to connect to a database, see [[#Logging In to the Database]]. | + | The '''Defined Login''' to be used by Workbench during development to connect with the database, and to read or write table information. |
| + | |||
| + | For more information on how to use a development login to connect to a database, see [[#Logging In to the Database|Logging In to the Database]]. | ||
|- align="left" valign="top" | |- align="left" valign="top" | ||
| id="r3c1-t5" headers="r1c1-t5" align="left" | '''Deployment Login''' | | id="r3c1-t5" headers="r1c1-t5" align="left" | '''Deployment Login''' | ||
| Line 381: | Line 361: | ||
| − | + | See Also: | |
| − | + | : [[#Configuring Development and Deployment Logins|Configuring Development and Deployment Logins]] | |
| − | : [[#Configuring Development and Deployment Logins]] | + | : [[Introduction%20to%20Projects (ELUG)#Development Role|Development Role]] |
| − | : [[Introduction%20to%20Projects|Development Role]] | + | |
==Logging In to the Database== | ==Logging In to the Database== | ||
| − | + | Using Workbench, after you [[#Configuring Login Information at the Project Level|create a login]] and specify it as a [[#Configuring Development and Deployment Logins|development login]], you can log in to a database instance. | |
| − | Using Workbench, after you | + | |
You must log in to the database before importing or exporting table information. | You must log in to the database before importing or exporting table information. | ||
| − | |||
To log in to the database using Workbench, use one of the following procedures: | To log in to the database using Workbench, use one of the following procedures: | ||
| − | + | * Select the database object in the '''Navigator''' and click '''Login''' [[Image:loginbtn.gif|Database Login button]]. Workbench logs in to the database. | |
| − | * | + | |
* Right-click on the database object in the '''Navigator''' and choose '''Log In to Database''' from the context menu, or choose '''Selected > Log In to Database''' from the menu. | * Right-click on the database object in the '''Navigator''' and choose '''Log In to Database''' from the context menu, or choose '''Selected > Log In to Database''' from the menu. | ||
| − | [[Image:logindb.gif|Database Logged In icon]] | + | [[Image:logindb.gif|Database Logged In icon]] The database icon in the Navigator window changes to indicate you are now logged in to the database. |
| − | + | ||
| − | The database icon in the Navigator window changes to indicate you are now logged in to the database. | + | |
| Line 416: | Line 390: | ||
This section describes configuring parameterized SQL and statement caching options at the project level. This configuration applies to ''all'' named queries or finders (see [[Introduction%20to%20EclipseLink%20Queries%20(ELUG)|Named Queries]]) you create on the descriptors in this project–not to all queries in general or write operations. | This section describes configuring parameterized SQL and statement caching options at the project level. This configuration applies to ''all'' named queries or finders (see [[Introduction%20to%20EclipseLink%20Queries%20(ELUG)|Named Queries]]) you create on the descriptors in this project–not to all queries in general or write operations. | ||
| − | You can also configure parameterized SQL and statement caching options at the named query or finder-level to override this project-level configuration on a query-by-query basis (see [[Configuring%20a%20Descriptor%20(ELUG)|Configuring Named Query Options]]) or at the session login-level (see [[Configuring%20a%20Database%20Login%20(ELUG)|Configuring JDBC Options]]) | + | You can also configure parameterized SQL and statement caching options at the named query or finder-level to override this project-level configuration on a query-by-query basis (see [[Configuring%20a%20Descriptor%20(ELUG)#Configuring Named Query Options|Configuring Named Query Options]]) or at the session login-level (see [[Configuring%20a%20Database%20Login%20(ELUG)#Configuring JDBC Options|Configuring JDBC Options]]). |
| − | + | ||
| − | + | ||
| + | For more information, see [[Optimizing%20the%20EclipseLink%20Application%20(ELUG)#How to Use Parameterized SQL (Parameter Binding) and Prepared Statement Caching for Optimization|How to Use Parameterized SQL (Parameter Binding) and Prepared Statement Caching for Optimization]]. | ||
{| class="Note oac_no_warn" width="80%" border="1" frame="hsides" rules="groups" cellpadding="3" frame="hsides" rules="groups" | {| class="Note oac_no_warn" width="80%" border="1" frame="hsides" rules="groups" cellpadding="3" frame="hsides" rules="groups" | ||
| align="left" | | | align="left" | | ||
| − | + | '''Note'''<nowiki>:</nowiki> For applications using a Java EE data source or external connection pool, you must configure statement caching in the Java EE server's data source–not in EclipseLink. | |
|} | |} | ||
| Line 436: | Line 409: | ||
|- align="left" valign="top" | |- align="left" valign="top" | ||
! id="r1c1-t7" align="left" valign="bottom" | '''Descriptor''' | ! id="r1c1-t7" align="left" valign="bottom" | '''Descriptor''' | ||
| − | ! id="r1c2-t7" align="left" valign="bottom" | '''[[#How to Configure Named Query Parameterized SQL and Statement Caching at the Project Level Using Workbench]]''' | + | ! id="r1c2-t7" align="left" valign="bottom" | '''[[#How to Configure Named Query Parameterized SQL and Statement Caching at the Project Level Using Workbench|How to use the Workbench]]''' |
! id="r1c3-t7" align="left" valign="bottom" | '''How to Use Java''' | ! id="r1c3-t7" align="left" valign="bottom" | '''How to Use Java''' | ||
|- align="left" valign="top" | |- align="left" valign="top" | ||
| Line 460: | Line 433: | ||
[[Image:unsupport.gif|Unsupported]] | [[Image:unsupport.gif|Unsupported]] | ||
|} | |} | ||
| − | |||
| Line 469: | Line 441: | ||
# Select the project object in the '''Navigator'''. | # Select the project object in the '''Navigator'''. | ||
# Select the '''Defaults''' tab in the '''Editor'''. The Defaults tab appears.<br><span id="Figure 25-5"></span>''''' Defaults Tab, Named Queries Options'''''<br>[[Image:nmdqropt.gif|Defaults Tab, Named Queries Options]] | # Select the '''Defaults''' tab in the '''Editor'''. The Defaults tab appears.<br><span id="Figure 25-5"></span>''''' Defaults Tab, Named Queries Options'''''<br>[[Image:nmdqropt.gif|Defaults Tab, Named Queries Options]] | ||
| − | # Complete the | + | # Complete the '''Named Query''' options on the tab. |
Use this table to enter data in following fields on the Defaults tab to specify the named query options for newly created descriptors.: | Use this table to enter data in following fields on the Defaults tab to specify the named query options for newly created descriptors.: | ||
| − | |||
| − | |||
| − | |||
{| class="HRuleInformal" dir="ltr" title="This table defines the named query options on the Defaults tab" summary="This table defines the named query options on the Defaults tab" width="100%" border="1" frame="hsides" rules="rows" cellpadding="3" frame="hsides" rules="rows" | {| class="HRuleInformal" dir="ltr" title="This table defines the named query options on the Defaults tab" summary="This table defines the named query options on the Defaults tab" width="100%" border="1" frame="hsides" rules="rows" cellpadding="3" frame="hsides" rules="rows" | ||
|- align="left" valign="top" | |- align="left" valign="top" | ||
| Line 488: | Line 457: | ||
|} | |} | ||
| − | + | See Also: | |
| − | + | : [[#Configuring Named Query Parameterized SQL and Statement Caching at the Project Level|Configuring Named Query Parameterized SQL and Statement Caching at the Project Level]] | |
| − | + | ||
| − | : [[#Configuring Named Query Parameterized SQL and Statement Caching at the Project Level]] | + | |
: [[Configuring%20a%20Project%20(ELUG)|Configuring a Project]] | : [[Configuring%20a%20Project%20(ELUG)|Configuring a Project]] | ||
| Line 497: | Line 464: | ||
==Configuring Table Generation Options== | ==Configuring Table Generation Options== | ||
| − | |||
Using Workbench, you can configure options that apply when you generate database tables from the descriptors you define in your Workbench project. The resulting tables and columns will conform to the naming restrictions of the project's target database. | Using Workbench, you can configure options that apply when you generate database tables from the descriptors you define in your Workbench project. The resulting tables and columns will conform to the naming restrictions of the project's target database. | ||
| − | |||
| Line 507: | Line 472: | ||
# Select the project object in the '''Navigator'''. | # Select the project object in the '''Navigator'''. | ||
| − | # Select the '''Options''' tab in the '''Editor'''. The Options tab appears.<br><span id="Figure 25-6"></span>''''' Options Tab, Table Generation Options'''''[[Image:prjtbgen.gif|Options Tab, Table Generation Options]] | + | # Select the '''Options''' tab in the '''Editor'''. The Options tab appears.<br><span id="Figure 25-6"></span>''''' Options Tab, Table Generation Options'''''<br>[[Image:prjtbgen.gif|Options Tab, Table Generation Options]] |
| − | # Complete the fields on the | + | # Complete the fields on the Table Generation defaults on the tab. |
Use this table to enter data in the following fields to specify the default export and generation options. | Use this table to enter data in the following fields to specify the default export and generation options. | ||
| − | |||
| − | |||
| − | |||
{| class="HRuleInformal" dir="ltr" title="This table defines Table Generation options on the Options tab." summary="This table defines Table Generation options on the Options tab." width="100%" border="1" frame="hsides" rules="rows" cellpadding="3" frame="hsides" rules="rows" | {| class="HRuleInformal" dir="ltr" title="This table defines Table Generation options on the Options tab." summary="This table defines Table Generation options on the Options tab." width="100%" border="1" frame="hsides" rules="rows" cellpadding="3" frame="hsides" rules="rows" | ||
|- align="left" valign="top" | |- align="left" valign="top" | ||
| Line 531: | Line 493: | ||
Using Workbench, you can configure options that apply when you export Java source code that you can use to create database tables. | Using Workbench, you can configure options that apply when you export Java source code that you can use to create database tables. | ||
| − | |||
| Line 539: | Line 500: | ||
# Select the project object in the '''Navigator'''. | # Select the project object in the '''Navigator'''. | ||
| − | # Select the '''Options''' tab in the '''Editor'''. The Options tab appears.<br><span id="Figure 25-7"></span>''''' Options Tab, Table Creator Java Source Options'''''[[Image:prjtblcrt.gif|Options Tab, Table Creator Java Source Options]] | + | # Select the '''Options''' tab in the '''Editor'''. The Options tab appears.<br><span id="Figure 25-7"></span>''''' Options Tab, Table Creator Java Source Options'''''<br>[[Image:prjtblcrt.gif|Options Tab, Table Creator Java Source Options]] |
| − | # Complete the fields on the | + | # Complete the fields on the Table Creator Java Source defaults on the tab. |
Use this table to enter data in the following fields to specify the default table creator options. | Use this table to enter data in the following fields to specify the default table creator options. | ||
| − | |||
| − | |||
| − | |||
{| class="HRuleInformal" dir="ltr" title="This table defines This table defines the Table Creator Java Source options on the Options tab" summary="This table defines the Table Creator Java Source options on the Options tab" width="100%" border="1" frame="hsides" rules="rows" cellpadding="3" frame="hsides" rules="rows" | {| class="HRuleInformal" dir="ltr" title="This table defines This table defines the Table Creator Java Source options on the Options tab" summary="This table defines the Table Creator Java Source options on the Options tab" width="100%" border="1" frame="hsides" rules="rows" cellpadding="3" frame="hsides" rules="rows" | ||
|- align="left" valign="top" | |- align="left" valign="top" | ||
| Line 564: | Line 522: | ||
Using Workbench, you can export a project as Java source. You can configure the class name and root directory that Workbench uses when exporting the project to Java source code. | Using Workbench, you can export a project as Java source. You can configure the class name and root directory that Workbench uses when exporting the project to Java source code. | ||
| − | For more information on exporting a project as Java source, see [[Creating%20a%20Relational%20Project%20(ELUG)|How to Export Project Java Source Using Workbench]]. | + | For more information on exporting a project as Java source, see [[Creating%20a%20Relational%20Project%20(ELUG)#How to Export Project Java Source Using Workbench|How to Export Project Java Source Using Workbench]]. |
| − | + | ||
| Line 574: | Line 531: | ||
# Select the project object in the '''Navigator'''. | # Select the project object in the '''Navigator'''. | ||
# Select the '''Options''' tab in the '''Editor'''. The Options tab appears.<span id="Figure 25-8"></span><br>''''' Options Tab, Project Java Source Options'''''<br>[[Image:prjavasrc.gif|Options Tab, Project Java Source Options]] | # Select the '''Options''' tab in the '''Editor'''. The Options tab appears.<span id="Figure 25-8"></span><br>''''' Options Tab, Project Java Source Options'''''<br>[[Image:prjavasrc.gif|Options Tab, Project Java Source Options]] | ||
| − | # Complete the fields on the | + | # Complete the fields on the Project Java Source defaults on the tab. |
Use this table to enter data in the following fields to specify the default export and generation options: | Use this table to enter data in the following fields to specify the default export and generation options: | ||
| − | |||
| − | |||
{| class="HRuleInformal" dir="ltr" title="This table defines This table defines the Project Java Source options on the Options tab." summary="This table defines the Project Java Source options on the Options tab." width="100%" border="1" frame="hsides" rules="rows" cellpadding="3" frame="hsides" rules="rows" | {| class="HRuleInformal" dir="ltr" title="This table defines This table defines the Project Java Source options on the Options tab." summary="This table defines the Project Java Source options on the Options tab." width="100%" border="1" frame="hsides" rules="rows" cellpadding="3" frame="hsides" rules="rows" | ||
| Line 600: | Line 555: | ||
[[Category: EclipseLink User's Guide]] | [[Category: EclipseLink User's Guide]] | ||
| − | [[Category: | + | [[Category: Release 1]] |
[[Category: Task]] | [[Category: Task]] | ||
| + | [[Category: ORM]] | ||
Latest revision as of 11:25, 18 July 2012
![]() For the latest EclipseLink documentation, please see http://www.eclipse.org/eclipselink/documentation/
For the latest EclipseLink documentation, please see http://www.eclipse.org/eclipselink/documentation/
Contents
- 1 Configuring Relational Database Platform at the Project Level
- 2 Configuring Sequencing at the Project Level
- 3 Configuring Login Information at the Project Level
- 4 Configuring Development and Deployment Logins
- 5 Logging In to the Database
- 6 Configuring Named Query Parameterized SQL and Statement Caching at the Project Level
- 7 Configuring Table Generation Options
- 8 Configuring Table Creator Java Source Options
- 9 Configuring Project Java Source Code Options
This section describes the various components that you must configure in order to use a relational project.
This section also describes logging into a database during development when using Workbench. For more information, see Logging In to the Database.
For information on how to create relational projects, see Creating a Relational Project.
This table lists the configurable options for relational projects. In addition to the configurable options described here, you must also configure the base class options described in Configuring a Project.
| Option to Configure | EclipseLink Workbench | Java |
|---|---|---|
|
|
| |
|
|
| |
|
|
| |
|
|
| |
|
|
| |
|
|
| |
|
|
| |
|
|
| |
|
|
| |
|
|
| |
|
|
| |
|
|
| |
|
|
| |
|
|
| |
|
|
| |
|
|
| |
|
|
| |
|
|
| |
|
|
| |
|
|
|
For more information, see Introduction to Relational Projects.
Configuring Relational Database Platform at the Project Level
For each relational project, you must specify the database platform (such as Oracle Database 10g). This platform configuration is overridden by the session login, if configured.
For more information, see the following:
How to Configure Relational Database Platform at the Project Level Using Workbench
To specify the database platform of a relational project, use this procedure:
- Select the database object in the Navigator. The Database property sheet appears.
Database Property Sheet, Database Platform Options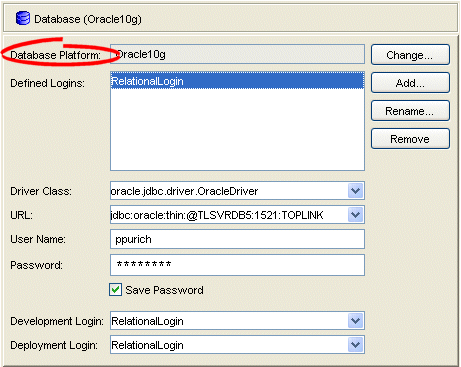
- Complete the Database Platform option on the property sheet.
- Click Change to select a new database platform for the project. For more information, see Data Source Platform Types.

Configuring Sequencing at the Project Level
Sequencing allows EclipseLink to automatically assign the primary key or ID of an object when the object is inserted.
You configure EclipseLink sequencing at the project or session level to tell EclipseLink how to obtain sequence values: that is, what type of sequences to use.
In a POJO project, you can configure a session directly: in this case, you can use a session-level sequence configuration to override project-level sequence configuration, on a session-by-session basis), if required (see .
Using the Workbench, you can configure Table Sequencing and native sequencing (see Native Sequencing with an Oracle Database Platform and Native Sequencing with a Non-Oracle Database Platform), and you can configure a preallocation size that applies to all sequences (see Sequencing and Preallocation Size).
Using Java, you can configure any sequence type that EclipseLink supports (see Sequencing Types). You can create any number and combination of sequences. You can create a sequence object explicitly or use the default sequence that the platform creates. You can associate the same sequence with more than one descriptor and you can configure a separate preallocation size for each descriptor's sequence.
After configuring the sequence type at the project (or session) level, to enable sequencing, you must configure a descriptor with a sequence field and a sequence name.
For more information about sequencing, see Sequencing in Relational Projects.
How to Configure Sequencing at the Project Level Using Workbench
To specify the sequencing information for the project, use this procedure:
- Select the project object in the Navigator.
- Select the Sequencing tab in the Editor. The Sequencing tab appears.
Sequencing Tab
- Complete each field on Sequencing tab.

Use this table to enter data in the following fields to configure the sequencing information:
| Field | Description |
|---|---|
| Preallocation Size |
Specify the default preallocation size (see Sequencing and Preallocation Size). Default is 50. The preallocation size you configure applies to all sequences. |
| Default Sequence Table |
Select this option to use table sequencing (see Table Sequencing) with default sequence table name |
| Native Sequencing |
Select this option to use a sequencing object (see Native Sequencing with an Oracle Database Platform or Native Sequencing with a Non-Oracle Database Platform) created by the database platform. This option applies only to Oracle, Sybase, Microsoft SQL, and IBM Informix database platforms. |
| Custom Sequence Table |
Select this option to use table sequencing (see Table Sequencing) with a sequence table name, sequence name field, and sequence counter field name that you specify. |
| Name | Specify the name of the sequence table. |
| Name Field | Specify the name of the column used to store the sequence name. |
| Counter Field | Specify the name of the column used to store the sequence count. |
How to Configure Sequencing at the Project Level Using Java
Using Java, you can configure a project to use multiple, different sequences, as this exmaple shows.
Configuring Sequencing at the Project Level in Java
 // Enable native sequencing for the project as the default. Configured the default
 // preallocation size'''
 project.getLogin().useNativeSequencing();
 project.getLogin().setSequencePreallocationSize(50);

 // Configure the EMP_SEQ to not use preallocation
 DefaultSequence empSequence = new DefaultSequence("EMP_SEQ", 1);
 project.getLogin().addSequence(empSequence);

 // Configure the PROJ_SEQ to use a seperate sequence table
 UnarySequence projSequence = new UnarySequence("PROJ_SEQ_TAB", "COUNTER");
 project.getLogin().addSequence(projSequence);
Configuring Login Information at the Project Level
This section describes how to define a login to a relational database. After you define a login, you must designate its role.
After you create a login and specify it as a development login, you can log in to a database instance.
How to Configure Login Information at the Project Level UsingWorkbench
To create or edit a database login, use this procedure:
- Select the database object in the Navigator. The Database property sheet appears.
Database Property Sheet, Database Login Fields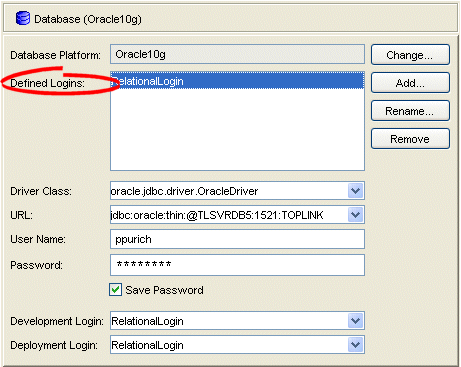
- Click Add to create a new Defined Login.
- Complete the Database Login fields on the property sheet.

Use this table to enter data in the following fields on the Database property sheet to configure the database login:
| Field | Description |
|---|---|
| Defined Logins | Login used to access the database. Click Add to add a new login, or Remove to delete an existing login. |
| Driver Class | The JDBC driver to use to connect to the database. |
| URL | The URL used to connect to the appropriate database. |
| User Name | The name required to log in to the database. |
| Password | The password required to log in to the database. |
|
Whether or not to save the Password for this Defined Login. We recommend that you do not save the password with a deployment login. Note: If you select Save Password, then when you export Java source and deployment XML, Workbench writes the database password using JCE encryption (when using JDK 1.4 or later). For information on how to specify password encryption options, see Configuring Password Encryption. Default: unselected. |
See Also:
- Configuring Login Information at the Project Level
- Configuring Relational Database Platform at the Project Level
- Configuring Development and Deployment Logins
Configuring Development and Deployment Logins
This section describes how to designate a defined login's role. For information on how to define a login, see Configuring Login Information at the Project Level. EclipseLink recognizes the following login roles:
Development Role
While using Workbench to develop a project (see Development Role), you must define a login (see Configuring Login Information at the Project Level) and designate it as the development login. The development login is stored in the EclipseLink project file. Workbench use the information in the development login whenever you perform a data source operation from within Workbench. For example, when you read or write schema information from or to a data source during application development, the development login information is never written to a sessions.xml or project.xml file and is overridden by the deployment login (or the session login) at run time.
For more information on how to use a development login to connect to a database, see Logging In to the Database.
POJO Session Role
If you are creating a POJO project, we recommend that you use the sessions.xml file to store the sessions your project uses at run time (see Data Source Login Types).
How to Configure Development and Deployment Logins Using Workbench
To specify different development and deployment database logins, use this procedure:
- Select the database object in the Navigator. The Database property sheet appears.
Database Property Sheet, Development and Deployment Login Options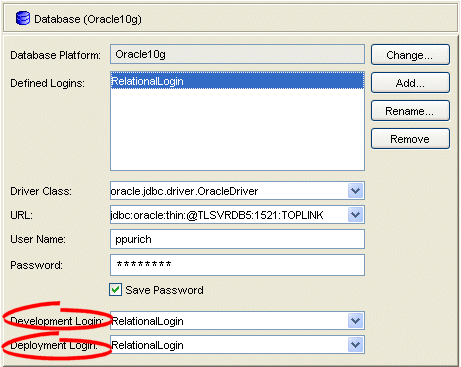
- Complete the Development and Deployment Login options on the property sheet by selecting from the logins you configured previously.

Use this table to enter data in the following fields on the Database property sheet to configure the login:
| Field | Description |
|---|---|
| Development Login |
The Defined Login to be used by Workbench during development to connect with the database, and to read or write table information. For more information on how to use a development login to connect to a database, see Logging In to the Database. |
| Deployment Login | The Defined Login to be used by your EclipseLink-enabled application during deployment. |
See Also:
Logging In to the Database
Using Workbench, after you create a login and specify it as a development login, you can log in to a database instance.
You must log in to the database before importing or exporting table information.
To log in to the database using Workbench, use one of the following procedures:
- Select the database object in the Navigator and click Login Database Login button. Workbench logs in to the database.
- Right-click on the database object in the Navigator and choose Log In to Database from the context menu, or choose Selected > Log In to Database from the menu.
![]() The database icon in the Navigator window changes to indicate you are now logged in to the database.
The database icon in the Navigator window changes to indicate you are now logged in to the database.
Configuring Named Query Parameterized SQL and Statement Caching at the Project Level
You can configure EclipseLink to use parameterized SQL (parameter binding) and prepared statement caching for all named queries and finders.
By default, EclipseLink uses parameterized SQL.
The use of parameterized SQL lets you create and store queries that are complete except for one or more bound parameters. The EclipseLink runtime binds the current parameter values when executing the query. This approach avoids the preparation of SQL execution and, thus, improves the performance of frequently executed SQL statements.
This section describes configuring parameterized SQL and statement caching options at the project level. This configuration applies to all named queries or finders (see Named Queries) you create on the descriptors in this project–not to all queries in general or write operations.
You can also configure parameterized SQL and statement caching options at the named query or finder-level to override this project-level configuration on a query-by-query basis (see Configuring Named Query Options) or at the session login-level (see Configuring JDBC Options).
For more information, see How to Use Parameterized SQL (Parameter Binding) and Prepared Statement Caching for Optimization.
|
Note: For applications using a Java EE data source or external connection pool, you must configure statement caching in the Java EE server's data source–not in EclipseLink. |
This table summarizes which projects support parameterized SQL and statement caching configuration.
Project Support for Default Named Query Caching and Binding
| Descriptor | How to use the Workbench | How to Use Java |
|---|---|---|
|
Relational Projects |
|
|
|
EIS Projects |
|
|
|
XML Projects |
|
|
How to Configure Named Query Parameterized SQL and Statement Caching at the Project Level Using Workbench
To specify the named query options, use this procedure:
- Select the project object in the Navigator.
- Select the Defaults tab in the Editor. The Defaults tab appears.
Defaults Tab, Named Queries Options
- Complete the Named Query options on the tab.

Use this table to enter data in following fields on the Defaults tab to specify the named query options for newly created descriptors.:
| Field | Description |
|---|---|
| Cache All Statements | Caches the query's prepared statement in the EclipseLink statement cache. |
| Bind All Parameters |
By default, EclipseLink binds all of the query's parameters. Deselect this option to disable binding. |
See Also:
- Configuring Named Query Parameterized SQL and Statement Caching at the Project Level
- Configuring a Project
Configuring Table Generation Options
Using Workbench, you can configure options that apply when you generate database tables from the descriptors you define in your Workbench project. The resulting tables and columns will conform to the naming restrictions of the project's target database.
How to Configure Table Generation Options Using Workbench
To specify the default table generation options, use this procedure:
- Select the project object in the Navigator.
- Select the Options tab in the Editor. The Options tab appears.
Options Tab, Table Generation Options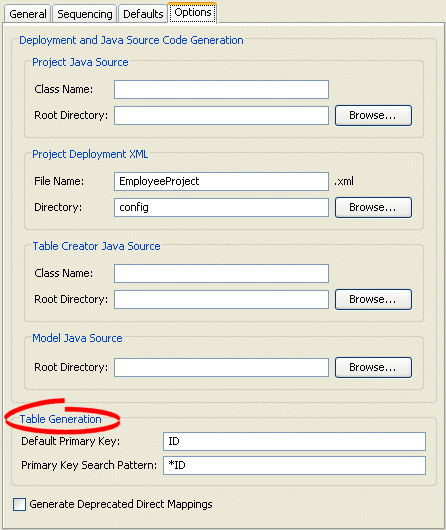
- Complete the fields on the Table Generation defaults on the tab.

Use this table to enter data in the following fields to specify the default export and generation options.
| Field | Description |
|---|---|
| Default Primary Key | Enter the default name to use when generating primary keys. |
| Primary Key Search Pattern | Enter the default search pattern to use when generating primary keys. |
Configuring Table Creator Java Source Options
Using Workbench, you can configure options that apply when you export Java source code that you can use to create database tables.
How to Configure Table Creator Java Source Options Using Workbench
To specify the default Java code generation options, use this procedure:
- Select the project object in the Navigator.
- Select the Options tab in the Editor. The Options tab appears.
Options Tab, Table Creator Java Source Options
- Complete the fields on the Table Creator Java Source defaults on the tab.

Use this table to enter data in the following fields to specify the default table creator options.
| Field | Description |
|---|---|
| Class Name | Base class name to use when generating table's Java source code from the project. |
| Root Directory | Directory for storing the generated source code. |
Configuring Project Java Source Code Options
Using Workbench, you can export a project as Java source. You can configure the class name and root directory that Workbench uses when exporting the project to Java source code.
For more information on exporting a project as Java source, see How to Export Project Java Source Using Workbench.
How to Configure Project Java Source Code Options Using Workbench
To specify the default Java code generation options, use this procedure:
- Select the project object in the Navigator.
- Select the Options tab in the Editor. The Options tab appears.
Options Tab, Project Java Source Options
Options Tab, Project Java Source Options - Complete the fields on the Project Java Source defaults on the tab.
Use this table to enter data in the following fields to specify the default export and generation options:
| Field | Description |
|---|---|
| Class Name | Base class name to use when generating Java source code from the project. |
| Root Directory | Directory for storing the generated source code. |