Notice: This Wiki is now read only and edits are no longer possible. Please see: https://gitlab.eclipse.org/eclipsefdn/helpdesk/-/wikis/Wiki-shutdown-plan for the plan.
Compiling ICE From Scratch
This article describes the build process for ICE. Previous experience of working with Eclipse plugins and Apache Maven will make this process much easier.
The ICE Development Team strongly recommends that most ICE users use a binary build from the website. 99% of users will never need to extend ICE and there is no benefit to a native build, so the binaries should work just fine. However, if you become a developer and wish to somehow extend ICE, or are simply a glutton for punishment, these instructions should provide everything you need.
Contents
- 1 Prerequisites
- 2 Source Download and Build with Eclipse
- 2.1 Loading the Source with Eclipse
- 2.1.1 Eclipse Requirements
- 2.1.2 Setup a New Repository Location
- 2.1.3 Downloading the Plugins
- 2.1.4 Downloading the Test Plugins
- 2.1.5 Downloading the Custom Target
- 2.1.6 Downloading the Product Definition
- 2.1.7 Downloading the Feature Definition
- 2.1.8 Downloading the Build Definition
- 2.1.9 Downloading the Third-Party Dependencies
- 2.1.10 Downloading the VisIt Bundle
- 2.2 Regular Command Line SVN Access
- 2.3 Creating and Launching an Initial Build of NiCE
- 2.4 Building NiCE Binaries using Maven
- 2.1 Loading the Source with Eclipse
- 3 Source Download and Build without Eclipse
- 4 Tips, Tricks, and Work-Arounds
Prerequisites
Building ICE requires all of the prerequisites of installing the binary versions of ICE. Please follow the instructions for configuring ICE's prerequisites in Getting ICE before continuing.
On the ICE dev boxes at ORNL, all of the required packages are installed in the ICE Packages Directory. (Ask a team member.)
Source Download and Build with Eclipse
The ICE source can be downloaded directly from the ICE Repository, although this option will require building the source code from scratch. The ICE Development Team uses Eclipse to download ICE, although access through regular SVN clients is allowed.
When downloading the ICE source code, it is also important to consider downloading and running the source code for the ICE tests from trunk/src. The steps necessary to download the tests are included below.
Loading the Source with Eclipse
Eclipse Requirements
In order to build and launch ICE, installation of Eclipse with the Plug-in Development Environment (PDE) is required. We recommend you download and install "Eclipse for RCP and RAP Developers" the Eclipse download site, which has the PDE plug-in already built in by default. Newer versions of the standard Eclipse also have the PDE included as well. To check if your version of Eclipse has the PDE plug-in installed, visit PDE site.
Downloading the ICE source code with Eclipse is a two-step process if you have never connected to the ICE Repository from Eclipse before. You must have a Subversion client installed in Eclipse as well. Instructions for that process for the "Subversive" SVN plugin are available the Subversive site. The following instructions and screenshots assume that you are using Subversive, but the process is nearly identical with alternative plugins such as Subclipse.
Building binaries that can be distributed requires Maven if being built from the command line. Or, if you would like to build from within Eclipse (recommended), installation of the m2e plugin is required.
Also, we recommend that you set up a separate Eclipse "Workspace" for storing the ICE plugin projects since there are many of them and they require a custom target.
Setup a New Repository Location
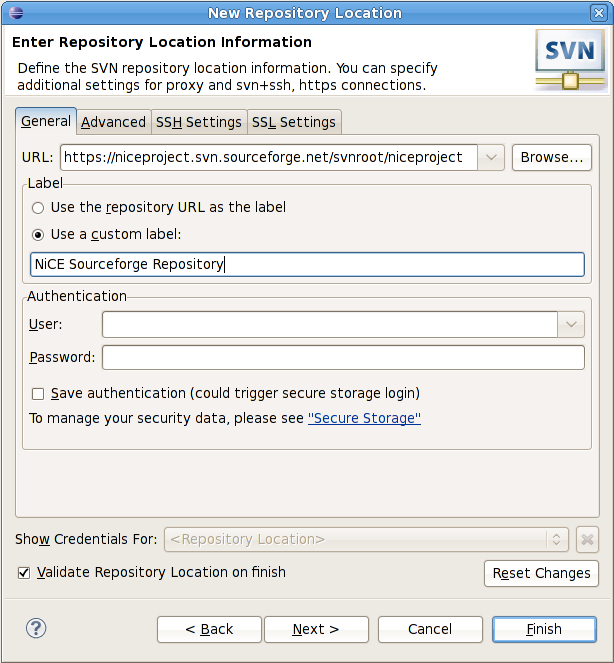
Click File > New > Other > SVN > Repository Location, enter the ICE Repository URL in the URL box and click Finish. If a box about the SSL certificate of the ICE repository appears, you may click Trust or Trust Always to connect to the site. If a box about "Secure Storage" appears, you may choose to enter a master password for the secure storage or not - the repository will work either way. If this is your first time creating a new repository location using Subversive, you will be prompted to select a Subversive Connector. In this case, simply select and install the SVN Kit 1.3.8 and/or 1.7.9 connector(s) prior to creating the ICE Repository Location. You will have to restart Eclipse to complete the SVN Kit connector installation.
Downloading the Plugins
- Click File > New > Other > Project From SVN and choose to use the newly configured NiCE Sourceforge Repository location.
- In the Checkout from SVN window, click Browse and when the Select Resource box appears, navigate to trunk/src to grab the plugins. Click OK and Finish to continue.
- The next window to appear is the Check Out As... window. It is very important to choose Find projects in the children of the selected resource instead of any of the other bullets. Select it and click Finish to continue.
- The next step window is the Check Out Projects window. There should be several projects selected. Make sure that the Check out as a projects into the workspace radio button is checked and click Finish to load the projects.
Downloading the Test Plugins
Follow the exact same steps as above to download the ICE Test Plugins, except instead of navigating to trunk/src in the Select Resource window, navigate to the trunk/tests directory. Note that when the Check Out Projects window appears, there is a test plugin for each of the source plugins as well as several other plugins. The individual test plugins that match the source plugins are used for unit testing and the additional plugins are for system and integration tests. Select all of the package, make sure that Check out as a projects into workspace is checked and click Finish to load the test plugins.
Downloading the Custom Target
ICE uses a custom Eclipse "target" to define the plugin environment in which the ICE plugins are built and run. This target must also be downloaded with the plugins. This is a very large project that contains all of the plugins and system-dependent code against which ICE is built and it may take several minutes to download. Follow the exact same instructions as above, but stay in trunk/ instead of navigating to the trunk/src or trunk/test directories and choose the org.eclipse.ice.target.kepler project.
Downloading the Product Definition
Building ICE binaries for distribution requires a product definition. A predefined product definition is available under the trunk/repository directory. You may create a custom product configuration or download the product project, org.eclipse.ice.repository, using SVN as described for the other projects above. In addition to the product definition, a "Feature" definition is required. Please read the following section for information about downloading ICE's feature definition. For more information on building NiCE binaries for distribution, please see the "Building NiCE Binaries using Maven" section of this article, which can be found below.
Downloading the Feature Definition
When building ICE binaries for distribution, a feature definition is required. A predefined feature definition is available under the trunk/features directory. You may create a custom feature configuration, or download the feature project, org.eclipse.ice.feature, using SVN as described for the other projects above.
Downloading the Build Definition
In addition to exporting binaries as a product, ICE binaries can be generated using the Maven build system. To create binary distributions of ICE using Maven, a build definition is required. A predefined build definition is available under the trunk/build directory. You may create a custom build configuration or download the build project, org.eclipse.ice.build, using SVN as described for the other projects above. For more information on building ICE binaries for distribution, please see the "Building ICE Binaries using Maven" section of this article, which can be found below.
Downloading the Third-Party Dependencies
The final bundles to download for ICE are the third-party dependencies found in the trunk/deps directory. You should check out each code in this directory into your workspace as you have done for the other bundles above. Please note that replacing the dependencies with stock archives of the third-party library will not work. These dependencies have been placed in the deps/ directory because they required some modification to work with ICE. Normally this is just the addition of a MANIFEST.mf file.
Downloading the VisIt Bundle
The gov.lbnl.visit.swt bundle integrates VisIt into ICE. You need it for visualization, but it must be obtained separately, through Git.
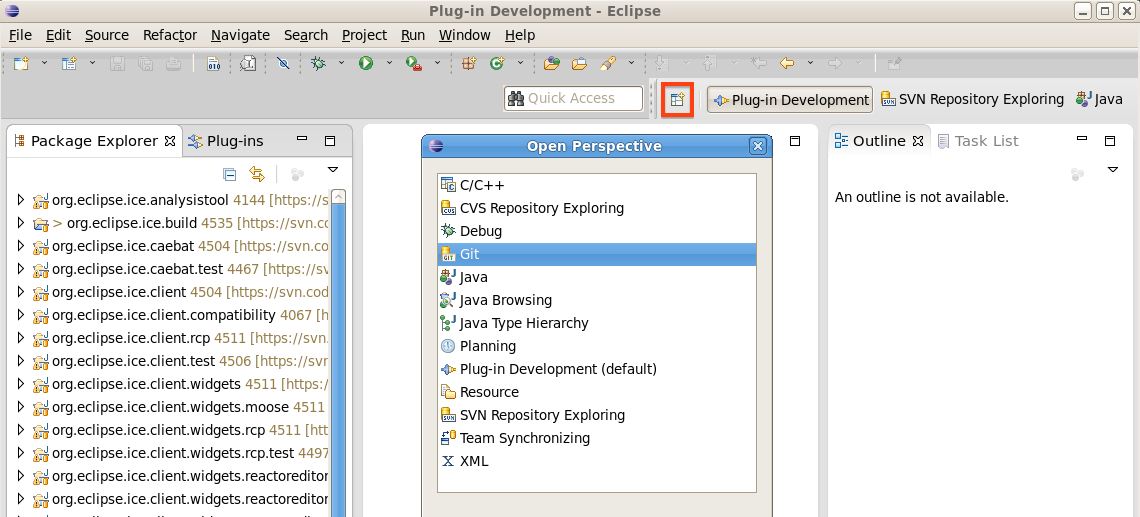
Git is probably already installed on Eclipse. To check, click the "Open Perspective" button at the top right your Eclipse window. If Git is an option, select it. If not, please see the "Tips, Tricks, and Workarounds" section of this article for help installing it.
Open your Git perspective and click on "Clone a Git Repository" in the toolbar. Of the three buttons with "GIT" labels, it will be the middle one.
Select Clone URI and hit Next.
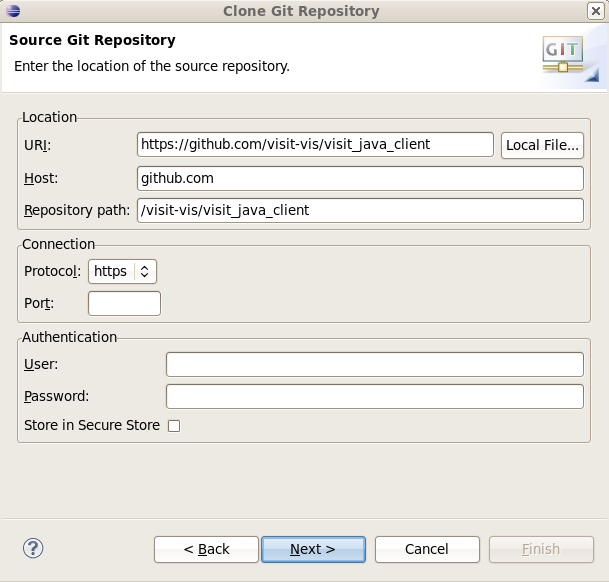
The URI of the source repository is https://github.com/visit-vis/visit_java_client
The rest of the necessary fields should auto-fill themselves, but you can verify everything is correct using the screenshot below. No authentication is necessary.
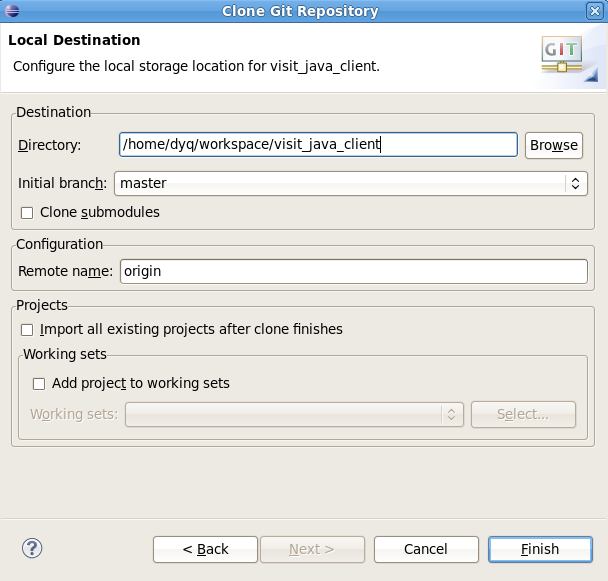
Verify you are getting the master branch, and click Next.
For the local destination, verify that visit_java_client will be placed into your workspace. In other words, the directory should be: /path-to-your-workspace/visit_java_client
If your other projects are part of a working set, you should add this directory to that same working set as well. Hit Finish.
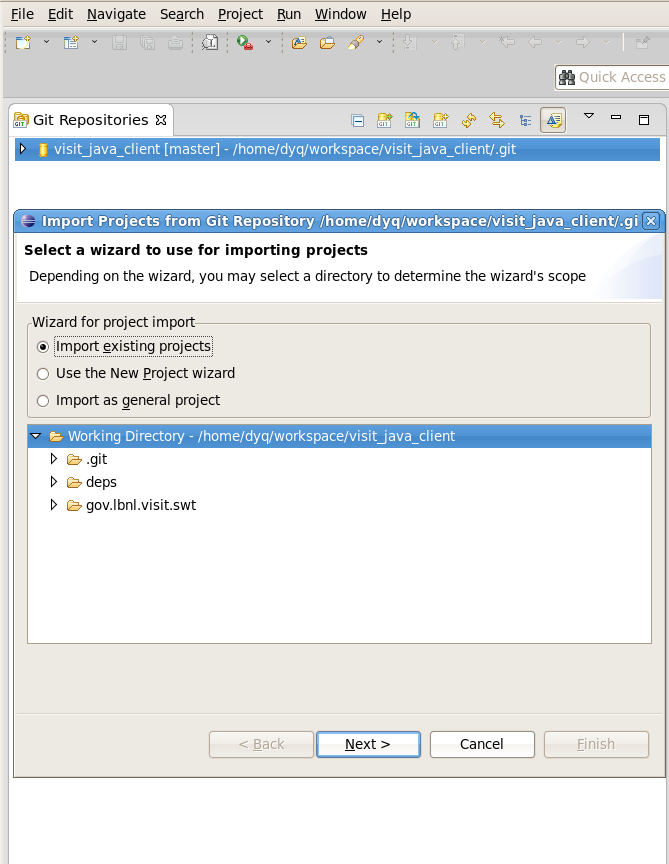
Now right-click on the Working Directory (while still in the Git perspective), and select Import Projects...
Be sure to select Import existing projects as shown below. Click Next.
Ensure that gov.lbnl.visit.swt is checked, and add the project to your working set if you've been using one. Hit Finish. You're done!
Regular Command Line SVN Access
ICE can be downloaded outside of Eclipse using the Subversion SVN client on Linux or something like the Tortoise SVN Client on Windows. Building ICE requires an Eclipse install with the target properly configured and exported as described above.
Creating and Launching an Initial Build of NiCE
Before building distributable binaries of ICE, it should be built and tested within Eclipse to make sure that it even works! Eclipse will automatically try to build NiCE when you download the plugins if you have Build Automatically checked under the Project menu item. Alternatively, if you do not use automatic builds, you can build manually by clicking Project > Build All. This should work fine as long as your target loads correctly, although you may have to check the JVM compliance settings in the preference menu if it won't build at all.
To load the custom target, open the org.eclipse.ice.target.kepler project, double click the kepler_rcp.target file, and click Set as Target Platform in the upper right corner of the target editor. Resetting the target can take several minutes, because it must download plugins. Members of the NiCE Development Team have occasionally encountered a bug that will pop up an error box and claim the target was unable to load, but with no particular problem specified. Simply clicking Set as Target Platform a second time normally proceeds without error. It may be necessary to configure the environment of the kepler_rcp file. To do so, open kepler_rcp.target and click the tab at the bottom labelled Environment. Once there, fill out the form by selecting the operating system, windowing system, architecture, and locale. Also, make sure the selected Java Runtime Environment is the same architecture as the architecture entered in the form (a 32-bit JRE for a 32-bit build of NiCE, 64-bit JRE for a 64-bit build of NiCE). Then, save the file and click the Set as Target Platform link at the top of the form.
Once Eclipse builds the class files, ICE can be launched within Eclipse by creating and executing a launch configuration. A predefined launch configuration is available in the org.eclipse.ice.client.rcp package. Simply open the package and right-click on the org.eclipse.ice.client.rcp.application.launch file and select Run As > org.eclipse.ice.client.rcp.application. Another way to launch ICE is to open the org.eclipse.ice.repository project and double-click the ice.product file. When the file is completely open, click Launch An Eclipse Application. If ICE launches successfully (you'll know if it fails), then you are ready to export a ICE binary.
Building NiCE Binaries using Maven
ICE is built using the Maven build system. ICE utilizes the Maven build system for creating binaries for multiple platforms and architectures as well as executing the test plugins. The Maven build system can be launched by command line using the mvn command or from within Eclipse using the m2e Eclipse plugin. Screenshots for this section are available at the end.
On the Command Line
Once Maven is installed, open a terminal window and change your current directory to the org.eclipse.ice.build/eclipse directory within your ICE Eclipse workspace (the default directory where you told Eclipse to install your files). Next, execute the following two statements in order:
mvn -N install
mvn install
The first command downloads and installs the required dependencies, which may take several minutes to complete, and it installs the ICE "parent" build configuration in your local Maven repository. The second command builds the ICE source and test bundles, executes the tests, and creates binaries if the tests pass. This may take a very long time if it is the first time you are building ICE, because Maven will download a lot of other plugins that it needs to build Eclipse RCP applications and to bootstrap itself. However, subsequent builds take about four minutes.
If you don't want to build ICE from files stored within your Eclipse workspace or if you downloaded the entire trunk directory from the repository, you can still build ICE. There is a second Maven build script located in trunk/src/org.eclipse.ice.build/hudson that is set up to build with the default trunk configuration. You can use the same commands to build with this script, and it should produce the same results. The ICE Dev Team uses both: we build from inside Eclipse while we are developing and before we commit to make sure the tests work, and we use the second script with an automated Hudson build that runs hourly on our development server.
Inside Eclipse
In order to build ICE binaries from Eclipse, you must use the m2e Eclipse plugin for Maven. It is recommended that the slf4j optional plugin be installed as well. Once the plugins are installed, open the org.eclipse.ice.build package and go to the eclipse directory. We need to follow the same steps as listed above, but in Eclipse there is no way to just execute a command like mvn -N install.
Since we have to run this command to install our parent build configuration, we need to create a custom run configuration. Right-click on the pom.xml file, scroll to Run As... and select Run Configurations at the bottom. In the menu that appears, select the Maven Build option in the left-side menu and click the new button (a small button that looks like a blank piece of paper with a gold plus sign on it) at the top. A new configuration will be created. You need to set the name at the top of the page, choose the org.eclipse.ice.build/eclipse directory and set the goal to -N install to properly launch the build. Click Apply and then Run.
This downloads and installs any required dependencies, and will probably take a while if this is your first time building ICE binaries. Once all dependencies are downloaded, the last step is to actually build ICE. To do this, right-click on the same pom.xml file in the org.eclipse.ice.build/eclipse directory, and select Run As > Maven install. This will build and test all of ICE's bundles. If this is your first time, this process could take upwards of 10-12 minutes depending on your system. If the build system encounters any errors or failed tests, they will be reported in the Eclipse console window, and the build will be terminated early. Alternatively, if the build is successful, a "BUILD SUCCESS" message will be displayed in the console once the build completes, and the ICE binaries will have been created in your Eclipse workspace.
Locating the NiCE Binaries
The resulting ICE binaries are written to a subdirectory of the org.eclipse.ice.repository package under target/products. Note that the target directory may not appear in the Eclipse Package Explorer until the org.eclipse.ice.repository package has been refreshed. To refresh this package, right-click on the package and select Refresh. To execute a resulting binary, unzip the product for your platform and architecture, go into the ICE directory, and run the ICE executable.
Building NiCE from a feature file directly in Eclipse using PDEBuild
It is possible, although no longer recommended, to build ICE as a product from an Eclipse Product Definition File directly instead of using Maven. To do this, open the org.eclipse.ice.repository package's ice.product file. You can usually do this by simply double-clicking the file in the Package Explorer or by right-clicking on the file and selecting Open With > Product Configuration Editor.
Next, select the feature's radio button in the Product Definition section on the nice.product Overview tab. In order to build a binary product from a feature, you must be able to launch NiCE. You can do this by clicking the Launch an Eclipse Application link under the Testing section of the ice.product Overview tab. If you are unable to launch ICE, please review the "Creating and Launching an Initial Build of ICE" section of the Getting ICE article.
Once you have successfully launched ICE, click the Eclipse Product export wizard link under the Exporting section of the Overview tab. In the export wizard, set Root directory to ICE and select a destination directory for your build(s). Next unselect the Synchronize before exporting, Generate metadata repository and Allow for binary cycles in target platform check boxes.
If you wish to build products for multiple platforms and architectures, select the "export for multiple platforms" check box. If you selected to export for multiple platforms, click Next. Then select the platforms and architectures you wish to export from the list. Currently the product definition in ICE supports both x86 and x86_64 bit architectures for win32, linux (gtk) and macosx (cocoa). Then click Finish. You can then access each build by going to the destination directory entered in the Export Product wizard. In this directory, there will be one or more directories labelled after each platform and architecture selected, or the default platform and architecture listed with the launch configuration.
Again, the ICE Dev Team recommends that you use Maven to build ICE. Building from the feature directory is, from our experience, very tricky.
Source Download and Build without Eclipse
On Linux and Mac machines with native bash terminals, ICE can be checked out from the repository and built extremely quickly. The continuous integration build of ICE does it this way and the developers occasionally do this for testing.
From the command line, execute the following commands to checkout and build ICE:
svn co https://svn.code.sf.net/p/niceproject/code/trunk niceProjectTrunk
cd niceProjectTrunk/build/org.eclipse.ice.build/hudson
mvn install -N
mvn install
Tips, Tricks, and Work-Arounds
Developing on Mac OS X
Setting the Target
When following the instructions given above in "Creating and Launching an Initial Build of ICE", changing the fields in the Environment tab to Mac-appropriate values and setting the target platform will produce several errors that will be displayed in the Definition tab. Most of these errors will express something to the effect of an inability to find a resource with "linux" or "gtk" in its name. To resolve these errors, select the Content tab, and deselect these plugins. Similarly, select their "macosx" and "cocoa" equivalents instead. Save these changes and click Set as Target Platform.
Setting the Launch Configuration
In a similar fashion to setting the target described above, click Run > Run Configurations... from the top menu bar. Select the org.eclipse.ice.client.rcp.application configuration from the left column. Click on the Plug-ins tab. Select all of the "macosx" or "cocoa" related plug-ins.
Installing EGit
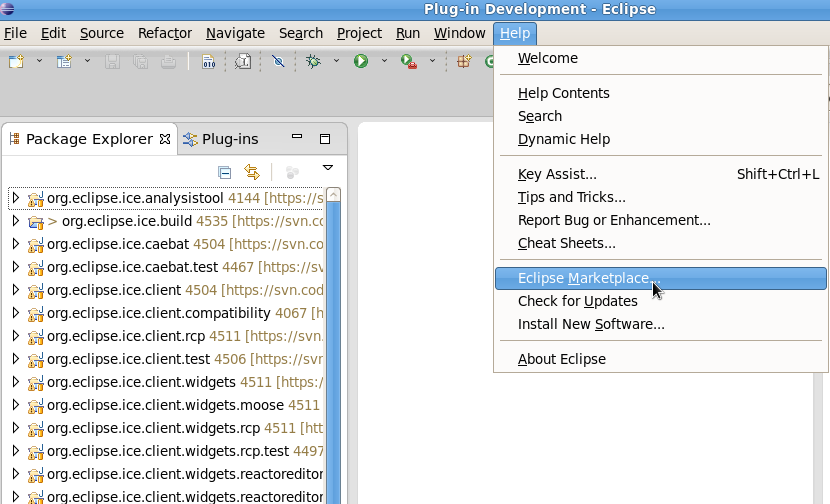
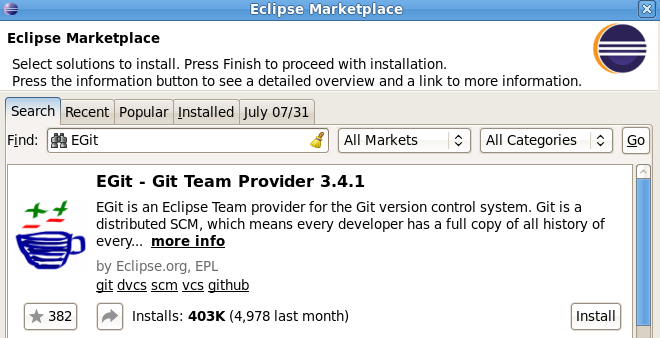
Go to Help > Eclipse Marketplace and search for EGit. After installation, you will need to restart Eclipse in order for the changes to take effect. Now, Git should be an option when choosing to open a new perspective.
Alternatively, you can go to Help > Install New Software... and type http://download.eclipse.org/egit/updates for Work With website. Select Eclipse Git Team Provider and install it.
HDF5 Binaries
If you are building on Mac OS X, you will likely experience build failures due to an inability to find HDF5 files. As a temporary fix until we take a deeper look into this issue, place all HDF5 binaries in ~/Library/Java/Extensions. This directory is part of the native java.library.path and allows for the necessary files to be discovered when placed in this directory.
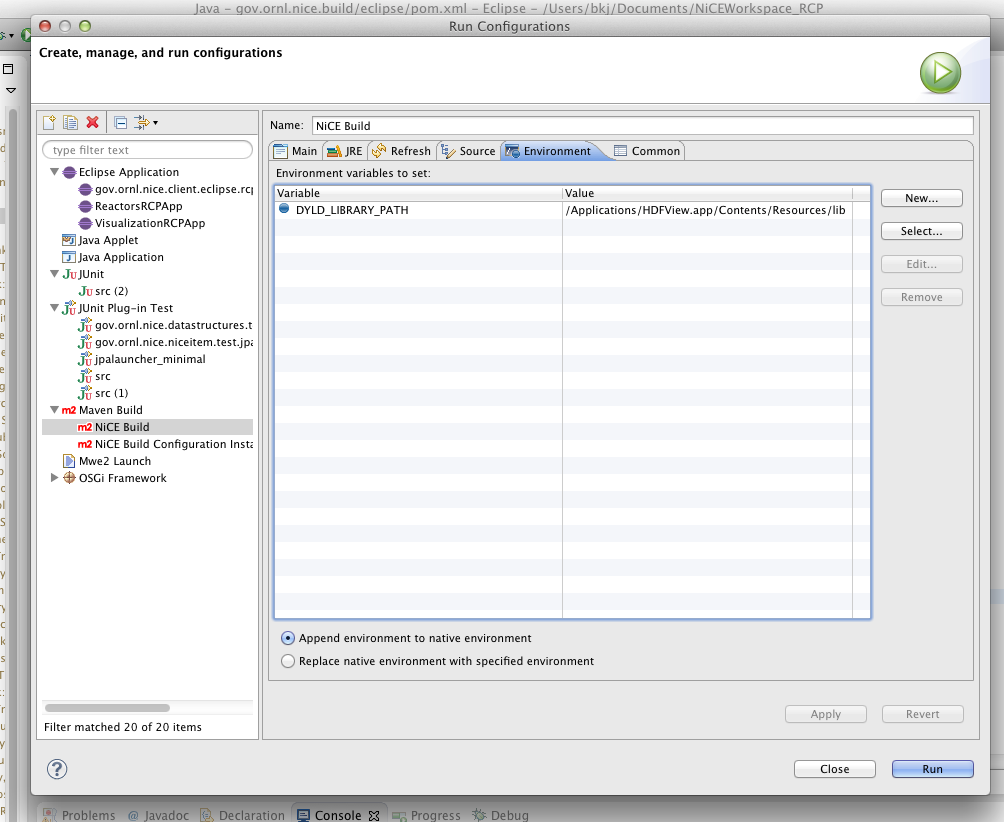
Alternatively, if you don't want to put HDF5 in the extensions directory, you can point your run configuration to the libraries by modifying the DYLD_LIBRARY_PATH environment variable as shown below.
The build should proceed past the org.eclipse.ice.io files after that.
Downloading the ICE UML Model
ICE is extensively modeled using the Unified Modeling Language (UML) and the UML model is available for download in the repository. It may be retrieved by taking the same steps as for the source code or tests above, but by navigating to trunk/model in the Select Resource window. Viewing this model will require IBM Rational Software Architect 8.0.3.

