Notice: This Wiki is now read only and edits are no longer possible. Please see: https://gitlab.eclipse.org/eclipsefdn/helpdesk/-/wikis/Wiki-shutdown-plan for the plan.
EclipseSCADA/Tutorials/EclipseMagazin
Contents
Eclipse SCADA a Tutorial
Abstract
Eclipse SCADA is the attempt to create a modular »construction kit« to create a custom SCADA system. It provides protocol adapters, a middleware to process data coming from devices, common modules which provide general SCADA functions, like alarms & events, historical data recording, UI components to create a HMI and a configuration framework. For all of these functions, implementations already exist, since its predecessor openSCADA. Some of them are quite comprehensive, some still rudimentary, but usable. Most of it is already battle tested, running already in production for years now. With the move to Eclipse, we try to strengthen the M2M efforts of the Eclipse foundation and also hope to benefit from the other projects in this area.
Since we are not completely finished, there is a chance that some things might be different than explained within this article. An updated version of this article (but in English) will be found at http://wiki.eclipse.org/EclipseSCADA/Tutorials/EclipseMagazin)
Introduction
What is SCADA? »SCADA (Supervisory Control and Data Acquisition) is defined as the monitoring and control of technichal processes by means of a computer system.« This definition from the German wikipedia is a pretty succinct way to put it. The predecessor of Eclipse SCADA – openSCADA – was created in 2006 within the context of a project to provide business applications access to legacy hardware with a tight integration between the physical workflow on the plant and its equivalent business representation. To achieve easy integration and platform independence it was decided to build the solution on the Java platform. At this time, a comprehensive SCADA solution was not required, although it was apparent from the start, that many functionality commonly found in SCADA systems would be needed. After analyzing the existent products on the market, it became clear that none of those would fit the bill, either being to expensive, not flexible enough or not with the features required.
Thus the decision was made to create the needed functionality from scratch and gradually open source the parts which were not customer specific. Most of the proprietary source code were protocol adapters for specific hardware, where even some of the protocols were adapted for the customer.
The general idea of it was to create a common protocol, which the business application will use to talk to the connected devices. Each device type would require a protocol adapter, which translates the specific protocol to the openSCADA protocol. This was the first version of the protocol called NET or GMPP. Within openSCADA these adapters are known as »drivers« or »hives«, which represent basically the server interface of openSCADA. A driver commonly runs in a separate process, in that way the driver can be easily restarted if something goes wrong, without taking the whole system with it. The business application will then use the client interface to connect to the drivers. Some of the drivers which were created are:
- Exec driver (executes shell calls and parses output)
- JDBC driver (periodically calls database and retrieves or updates values)
- Modbus driver
- SNMP driver
- OPC driver (based on the independently developed Utgard library)
- Proxy driver (can switch between multiple driver instances)
At the beginning a lot of the additional functionality beyond the simple protocol conversion was added to the hive implementation. This increased the complexity of configuration, and also made it complicated to correctly chain the operations which happen to the value of a tag (in Eclipse SCADA terminology called an »item«). Additionally the consumer had to configure a separate connection to each running driver. This led to the inception of some kind of middleware, we called it the »master server«.
The master server now contains all functions beyond the task of protocol conversion. It is based on an Equinox OSGi container and each block of functionality is running in its own bundle. This way we could move all advanced functionality to the master server, removing the cruft from the drivers. It also provides the opportunity to configure it during runtime, which was not possible with the simple drivers, which have an XML based configuration. Drivers can also be based on the same reconfigurable model, at the moment publicly available are:
- S7 driver (dave)
- Modbus
With the move to Eclipse we decided to keep the protocol implementation separate from the actual Eclipse SCADA driver wrapper, analogous to the OPC driver, where the protocol is encapsulated in a fine grained OPC specific API and the OPC driver which is of course openSCADA specific. In the future, we assume, there will be more projects which need a high quality implementation of commonly used protocols, and we don't want to force anyone to use the complete Eclipse SCADA project if only a way to talk to some device is needed. Also it may be possible that because of licensing restrictions, it is not always possible to integrate the driver with Eclipse SCADA. Two instances where we have this problem already, is the SNMP driver and the OPC driver. These can not be part of the Eclipse SCADA distribution because the underlying libraries are not EPL compatible. For this reason, openSCADA will be staying alive and provide those additional features.
The protocol conversion we have talked about so far only involves the data acquisition (DA) part of a SCADA system. Based on that, Eclipse SCADA provides more features:
- Alarms & Events (AE): handles process alarms, operator actions, responses generated by the system, informational messages, auditing messages
- Historical Data (HD): deals with recording values (provided by DA) and archiving these for later retrieval
- Configuration Administration (CA): handles creation of configurations for the server components, reconfiguration of the running system
- Visual Interface (VI): provides GUI components, based on Draw2D
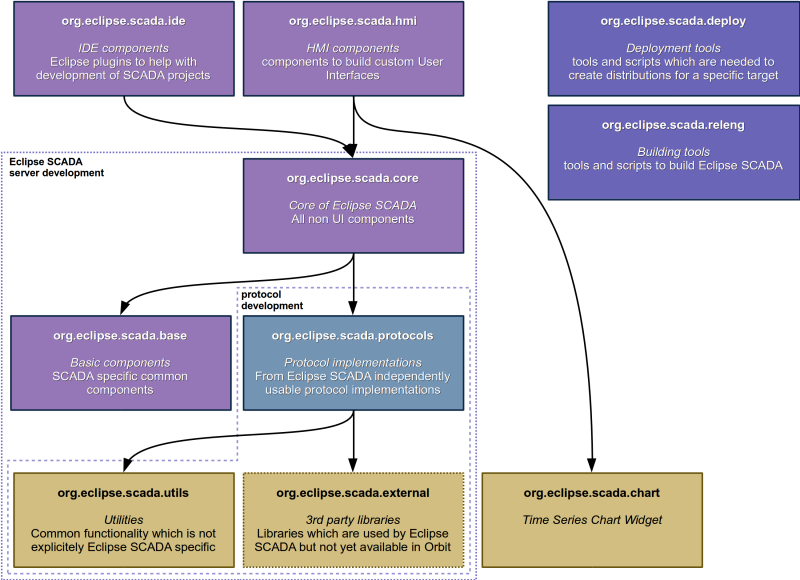
The separation of the different layers and responsibilities are reflected in our repository structure, as seen in Figure 1.
The OSTC
Originally called the OpenSCADA Test Client, its is now more than that, for instance used to deploy configuration files for master servers. The OSTC also has an integrated test server which can be used for first experiments. Since its migration to the Eclipse infrastructure is not complete yet, this tutorial will use the setup available through the openSCADA project (the latest 1.2 version at http://download.openscada.org/installer/ostc/I/).
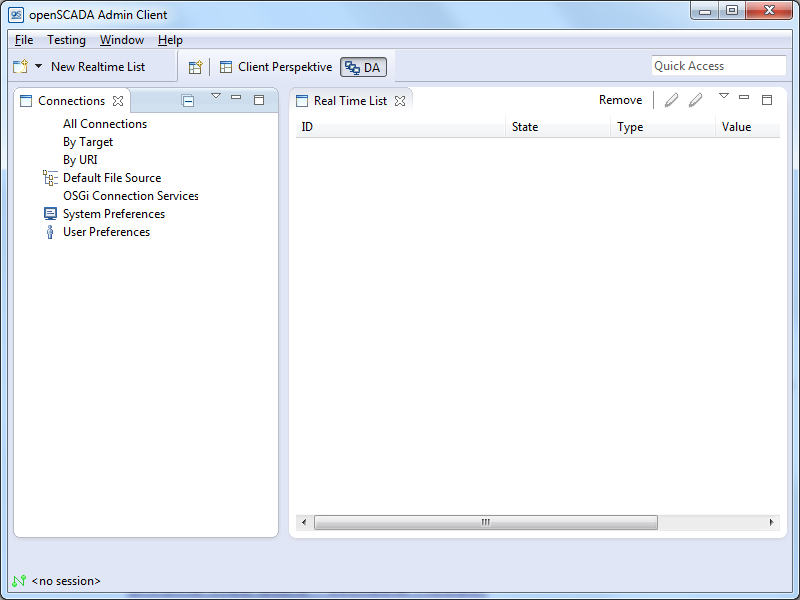
I assume, that you installed the OSTC, if you start it, and open the »DA perspective« you should be greeted with a screen as it is shown in figure 2.
Under connections you can add connections to SCADA servers, but only under the Nodes with the icons: Default File Source stores them within the standard working area, if you install a new version of the OSTC they are lost; User Preferences and System Preferences use both the Java preference API (http://docs.oracle.com/javase/7/docs/technotes/guides/preferences/) to store the connections within the user accessible area or the system area (that one will probably only work if you have admin rights). The other nodes are only different views of existing connections and can not be modified. This is useful if there are a multitude of servers configured. There they are sorted by different criteria.
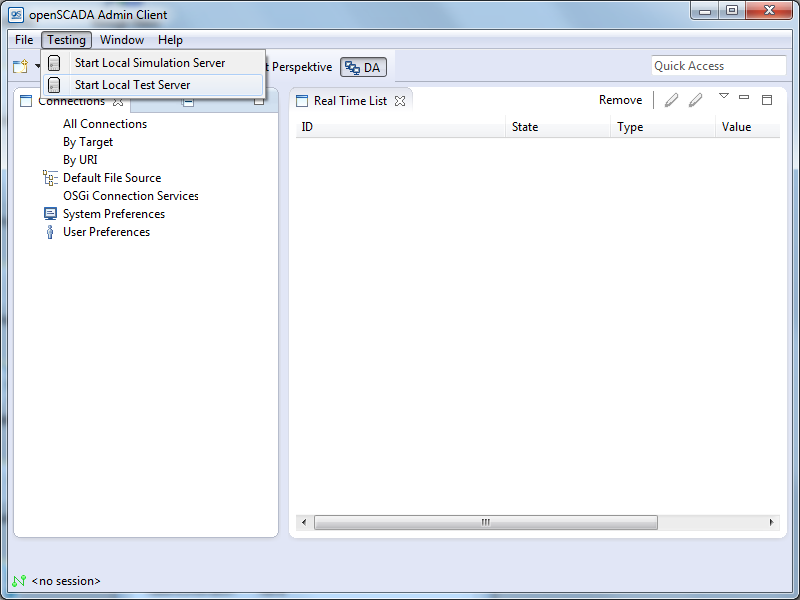
For now we start the Test Server using the menu item »Start Local Test Server« under »Testing«.
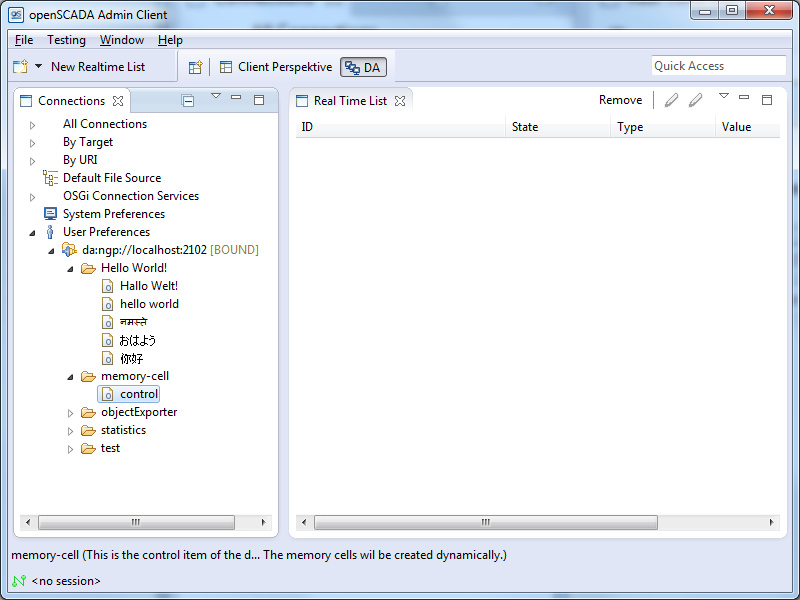
The next step is to add a connection, these are URLs, in our case this is »da:ngp://localhost:2102«.
ngp is the protocol, da is the variant of the protocol. The test server is running on port 2102. Now you can connect to the testserver using a double click on the connection. The connection state should change from »CLOSED« to »BOUND«. After that a list of nodes should appear under the connection node.
Expand the memory-cell folder and right click on the item »control«, select »Write Operation«, enter »2« as the value and click on »OK«. After that two more items, »0« and »1« should appear right above the control item. You can now drag those two items to the right into the »Real Time List«.
You can now either write a value on the item using the »Write Operation« Dialog, or use the »Signal Generator«. After that the item should have a value. It should also have an attribute »timestamp«. Depending on the implementation an item can have a number of attributes, »timestamp« the only universally available. Although a driver may poll a device for values, within Eclipse SCADA, each change will be propagated in an event oriented fashion. The basic idea is, if the device supplies a timestamp, as it is the case with some PLCs or OPC servers, the timestamp will be the original one from the device. In any other case Eclipse SCADA will generate one. Any value will be of the type Variant, which in turn can contain either: INT32, INT64, DOUBLE, BOOLEAN, STRING or NULL. Any data update will update both the items primary value, as well as the attributes. The server may choose to only send the changed attributes to reduce traffic. This complete set of data is repesented by the class DataItemValue. Our next step is to create a minimal client to retrieve these change events.
Setting up the IDE
You need to have the latest Kepler release with at least the PDE, EMF Tools and Acceleo installed. I recommend to install the »Eclipse IDE for Java and DSL Developers« variant. Check out following repositories (the ones which are marked with server development in the repository overview) and import the projects:
- http://git.eclipse.org/gitroot/eclipsescada/org.eclipse.scada.external.git
- http://git.eclipse.org/gitroot/eclipsescada/org.eclipse.scada.utils.git
- http://git.eclipse.org/gitroot/eclipsescada/org.eclipse.scada.protocols.git
- http://git.eclipse.org/gitroot/eclipsescada/org.eclipse.scada.base.git
- http://git.eclipse.org/gitroot/eclipsescada/org.eclipse.scada.core.git
After that there will be still compile errors. The reason for that is, that a bunch of libraries are used from the Orbit repository. To fix this, have a look at the target platform definition at the org.eclipse.scada.external-target project and set this at the target platform. Probably Eclipse will also complain that no API baseline is set. Use the quick fix to correct this problem, and just use the eclipse installation itself as the reference.
A simple client
For every item you want to get updates for, you need a subscription first. The code is pretty straight forward:
package org.eclipse.scada.eclipsemagazin;

import java.util.Observable;
import java.util.Observer;

import org.eclipse.scada.core.ConnectionInformation;
import org.eclipse.scada.core.client.AutoReconnectController;
import org.eclipse.scada.core.client.ConnectionFactory;
import org.eclipse.scada.core.client.ConnectionState;
import org.eclipse.scada.core.client.ConnectionStateListener;
import org.eclipse.scada.da.client.Connection;
import org.eclipse.scada.da.client.DataItem;
import org.eclipse.scada.da.client.DataItemValue;
import org.eclipse.scada.da.client.ItemManagerImpl;

public class SampleClient {

  public static void main(String[] args) throws InterruptedException {
    // the ConnectionFactory works a bit like JDBC,
    // every implementation registers itself when its loaded
    // alternatively it is also possible to use the connection
    // directly, but that would mean the code would have to be aware
    // which protocol is used, which is not desirable
    try {
      Class.forName("org.eclipse.scada.da.client.ngp.ConnectionImpl");
    } catch (ClassNotFoundException e) {
      System.err.println(e.getMessage());
      System.exit(1);
    }

    final String uri = "da:ngp://localhost:2102";

    final ConnectionInformation ci = ConnectionInformation.fromURI(uri);

    final Connection connection = (Connection) ConnectionFactory.create(ci);
    if (connection == null) {
      System.err.println("Unable to find a connection driver for specified URI");
      System.exit(1);
    }

    // just print the current connection state
    connection.addConnectionStateListener(new ConnectionStateListener() {
      @Override
      public void stateChange(org.eclipse.scada.core.client.Connection connection, ConnectionState state, Throwable error) {
        System.out.println("Connection state is now: " + state);
      }
    });

    // although it is possible to use the plain connection, the
    // AutoReconnectController automatically connects to the server
    // again if the connection is lost
    final AutoReconnectController controller = new AutoReconnectController(connection);
    controller.connect();

    // although it is possible to subscribe to an item directly,
    // the recommended way is to use the ItemManager, which handles the
    // subscriptions automatically
    final ItemManagerImpl itemManager = new ItemManagerImpl(connection);

    final DataItem dataItem = new DataItem("memory-cell-0", itemManager);
    dataItem.addObserver(new Observer() {
      @Override
      public void update(final Observable observable, final Object update) {
        final DataItemValue div = (DataItemValue) update;
        System.out.println(div);
      }
    });
  }
}
The output should look a bit like this (if you used the signal generator on the item)
Connection state is now: LOOKUP
Connection state is now: CONNECTING
NULL#[][none]
NULL#[][none]
Connection state is now: CONNECTED
Connection state is now: BOUND
NULL#[C][none]
DOUBLE#8.568166046545908[C][2013-10-21 12:03:14,390]
DOUBLE#7.645008970862307[C][2013-10-21 12:03:14,491]
DOUBLE#6.7023593269157775[C][2013-10-21 12:03:14,592]
DOUBLE#5.742622883254675[C][2013-10-21 12:03:14,692]
DOUBLE#4.768242160934602[C][2013-10-21 12:03:14,793]
DOUBLE#3.7915245591862776[C][2013-10-21 12:03:14,894]
DOUBLE#2.7954270074926617[C][2013-10-21 12:03:14,994]
...
To write a value, the code would look like this:
NotifyFuture<WriteResult> future = ((Connection) connection)
    .startWrite("memory-cell-1", Variant
    .valueOf(new Random().nextLong()),
    null, null);
The last two parameters, which are null in this example are: operationParameters and callbackHandler. Part of the operationParameters are e.g. user credentials. The callbackHandler is commonly used to request additional information, such as that an authentication is required, or that a cryptographic signature has to be send before the operation can be completed.
A simple driver
A driver actually consists of two parts: the hive implementation and the protocol exporter. To write a driver you only have to implement the hive, every exporter should work with it automatically. That's what we mean by separating the Java API from the protocol implementations. The basic features a server provides is browsing, subscribe/unsubscribe on/from items, and updating values on items. Items are sorted into folders, folders may contain other folders. The item name within a folder does not have to be the same as the actual item name, but it is convention that the folder structure should reflect the hierarchy defined through the item id. Different from file systems in SCADA systems the delimiter is usually a period.
package org.eclipse.scada.eclipsemagazin.hive;

import java.util.Random;
import java.util.concurrent.Executors;
import java.util.concurrent.ScheduledExecutorService;
import java.util.concurrent.TimeUnit;

import org.eclipse.scada.core.Variant;
import org.eclipse.scada.da.server.browser.common.FolderCommon;
import org.eclipse.scada.da.server.common.AttributeMode;
import org.eclipse.scada.da.server.common.DataItemInputCommon;
import org.eclipse.scada.da.server.common.impl.HiveCommon;
import org.eclipse.scada.utils.collection.MapBuilder;
import org.eclipse.scada.utils.concurrent.NamedThreadFactory;

public class RandomHive extends HiveCommon {

  private final FolderCommon rootFolder;

  private ScheduledExecutorService scheduler = null;

  private final Random random = new Random();

  public RandomHive() {
    super();

    // since it is possible to use a custom folder implementation
    // the root folder has to be explicitly set
    this.rootFolder = new FolderCommon();
    setRootFolder(this.rootFolder);
  }

  @Override
  public String getHiveId() {
    return "org.eclipse.scada.eclipsemagazin.hive";
  }

  @Override
  protected void performStart() throws Exception {
    super.performStart();

    // the executor is only used for the dataItem itself
    this.scheduler = Executors.newSingleThreadScheduledExecutor(new NamedThreadFactory(
						"org.eclipse.scada.eclipsemagazin.hive"));

    // create the item
    final RandomItem randomItem = new RandomItem("random");
    // register item with hive (initializes lifecycle)
    this.registerItem(randomItem);
    // add item to folder
    // the folder name does not have to be the same as the itemId!
    this.rootFolder.add("random", randomItem, null);
  }

  @Override
  protected void performStop() throws Exception {
    // just shut down scheduler
    if (this.scheduler != null) {
      this.scheduler.shutdownNow();
    }
    super.performStop();
  }

  private class RandomItem extends DataItemInputCommon implements Runnable {

  public RandomItem(final String name) {
    super(name);
    // every second call run
    scheduler.scheduleAtFixedRate(this, 0, 1, TimeUnit.SECONDS);
  }

  @Override
  public void run() {
    // just update item with a new random value, also set current
    // timestamp
    updateData(
      Variant.valueOf(random.nextLong()),
      new MapBuilder<String, Variant>()
        .put("description", Variant.valueOf("a random long value"))
        .put("timestamp", Variant.valueOf(System.currentTimeMillis()))
        .getMap(), AttributeMode.UPDATE);
      }
   }
}
To start the driver within the IDE you need to configure a launcher which starts the hive. For this each exporter has a wrapper with a main method which takes just two arguments, the name of the hive and optionally the configuration. Since we don't have any configuration, we can skip it, but we additionally define a different port on which the driver should run. To configure the classpath, just add all projects in the workspace to it, for this example that will do.
If you now configure the new Connection wthin the OSTC it should look like in figure 9.
In a real driver implementation of course you would have to implement the protocol you want to talk and map the corresponding tags, IOs or registers to the items. Our implementations are completely based on Apache Mina, but its entirely up to the implementor.
The master Server
Until now the server is pretty dumb, it just translates from one protocol to another. Any enrichment, be it additional transformations of the values, monitoring and alarms is done through the master server. It contains of a number of services running within an OSGi container, in our case Equinox.
The very difficult part to get the master server up and running is to define which services to start. We are working at the moment on it to provide an easy solution but at the moment it is still an manual process.
To get started with a real project, which includes configuration of the master server, we need to install the Configuration plugins in our Eclipse. The latest integration build can be found at: http://download.eclipse.org/eclipsescada/updates/release. Install following plugins:
- Eclipse SCADA Configuration tools
- Eclipse IDE DA Server Starter
The next step is to create a new Configuration Project. Press Ctrl+N to open the »New« wizard and select »Configuration Project«.
After that a new project with an example configuration should be created. To check if everything works, right click on »world.escm« and select »Eclipse SACAD Configuration → Run Generator«. This should create an output folder which contains the configuration artifacts.
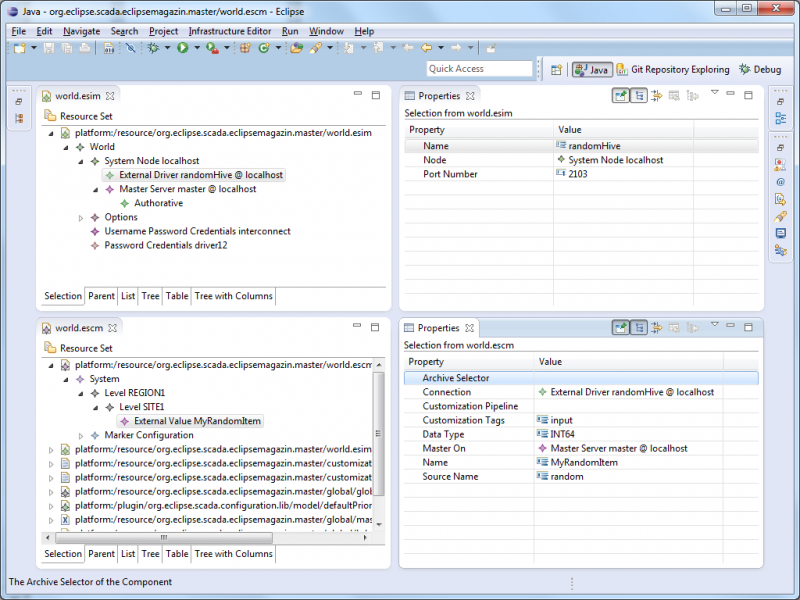
Since in the previous step we created a custom hive we want to integrate it with our example. For this we slim the configuration down to the essential. The configuration is split in two different models: the component model and the infrastructure model. The component model defines how the hierarchy of nodes will look like and which name they will get. The infrastructure model specifies on which actual hardware the different services will run. From the infrastructure model we remove node2 and rename node1 to localhost. We also remove the exec driver and the hdserver. In the component model we remove all Level nodes except REGION1/SITE1. The result should look like in figure 12 and when »Run Generator« is executed it should create a different output.
The generated configuration also contains a ».profile.xml« file which defines which bundles should be started within the OSGi container. Unfortunately at this time we don't have an automated way to launch the master server within the IDE with this configuration. For the purposes of this article I have created a little tool (CreateLaunchConfigs.java contained in org.eclipse.scada.eclipsemagazin.util) which will create a launch configuration from the profile. It has to be started manually after the generator has been run. Also it will not select the bundle dependencies, this is a manual step, just select »Add required plugins« in the launch configuration.
If you run it, you will be able to connect via the OSTC on port 2101 with username »admin« and password »admin12«. For now there are only some standard items available since we haven't configured anything else with it. If you look at the project within the workspace, you will see that there is now a folder _config. This is the actual configuration where the master server reads it from. If you specify a configuration folder and it does not exist, the master will create it automatically. The next step is to add our random hive and configure our random item.
First we have to add a new »External Driver« to the »localhost« System Node in the infrastructure model. Then name it »randomHive« and set the port number to 2103 (this is the port we configured for our hive exporter). We also need to define that the Master will have to make a connection to the randomHive, for that just add the randomHive driver to the property »Driver« of the Master Server Node.
Within the component model add a new »External Value« to »SITE1«. There select the »randomHive @ localhost« connection, add input to the »Customization tags«, set the Data Type to INT64, select the master for »Master On«, set the name as MyRandomItem and set random as source name. The models should now look like in figure 14.
Generate the configuration. If you stopped the random hive exporter, now is a good time to start it again. Recreate the launcher file and start the master server (remove the created _config directory first to allow automatic reconfiguration). If you now connect to the master with the OSTC it should now look like Figure 15.
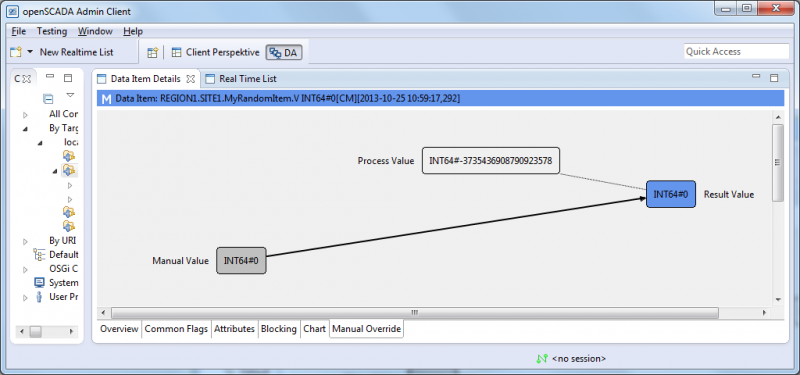
One of the available features the item now offers, which was not present in the original item from the hive, is: setting a manual value. The rationale behind is, if a device delivers an invalid value, and maybe calculations depend on it, as e.g. in calculating a density, then this offers a way to override it with a »good enough« value and still get somewhat correct result. To set a manual value, double click on the item, click on the left hand box »Manual Value«, enter 0 as value and confirm with »OK«. This will change the display of the item details from the one in figure 16 to the one visible in figure 17.
In the realtime list the value will now look like in figure 18.
As you can see, the primary value is now 0, and every derived value will only see 0 although with the manual flag. That means if there is a configured formula, it will only consider this manual value and additionally inherit the manual flag. The default convention in Eclipse SCADA is to mark manual values with the color blue. There are other color definitions, they are also configurable, but it is beyond the scope of this article.

